Know your endoscope
The module covers:
- Different parts of an endoscope in general
- The control section- the wheels
- The valves
- The grip section- the ID of the scope
- The tip
- The connection to the processor
Different parts of an endoscope in general
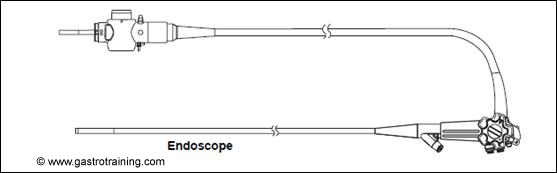
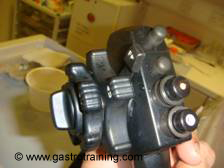
Picture 1: Olympus endoscope: Courtesy Olympus
In general it consists of
- A central control section which contains the big and small wheels and the different buttons to manipulate the picture
- It also houses the suction button and air/water button
- Immediately below it is the grip section which houses the biopsy/accessory port and also shows the ID of the scope
- Which leads to the boot section which leads to the insertion tube and the tip
- On the other side from the control section originates the umbilical cord which connects the scope to the processor
- The end of the umbilical cord is expanded which houses the air/water port, suction port, leak test port, light guide and electrical contact
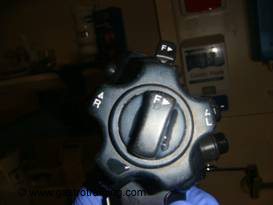
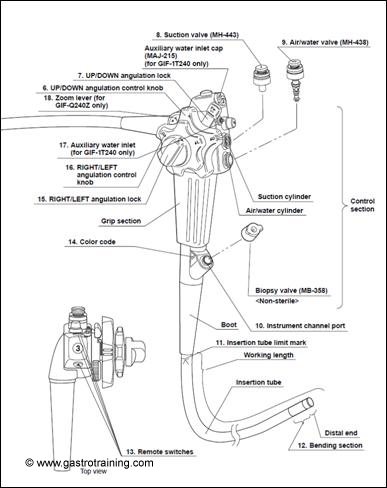
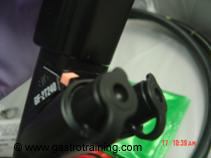
The control section- the wheel
Picture 2 : Pentax: the Control section with wheels and valves and remote picture control buttons
- Control knobs- big wheel (turns the tip of the scope up/down) and small wheel (turns the tip of the scope left/right).
- Angulation locks- for the big wheel (up/down) is underneath it and says F and lock for the small wheel (left/right) is on outer side of it and also says F. If you want to lock the wheels then turn it opposite to the direction of the arrow as indicated on the locking lever.
Picture 3: Pentax:The wheel locks - Suction cylinder with suction valve (red) on top
- Air/Water cylinder with Air/water valve (blue) below suction button ( valve has a whole in the centre compared to the solid suction valve)

Picture 4: Pentax: Suction cylinder on top and air/water cylinder at bottom
Picture 5: The different parts of an endoscope: Courtesy Olympus - Auxillary water inlet in some models of Olympus scopes
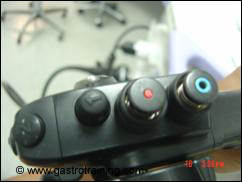
- Video remote buttons
- Button 1- placed just above the suction port-to freeze an image
- Button-2 – placed above button 1push to activate the hard copy system
- Button 3 – placed posterior to button2-VCR- push to record live procedures
- Button 4- posterior to button 3- for magnification
- Button 1 works in all scopes but button 2 sometimes is replaced by a foot switch – the hard copy is sometimes a file incorporated in the report rather than an actual hard copy. In most trusts we seldom saw button 3 and 4 working.
The valves
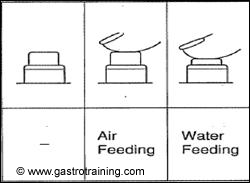
Picture 6: The valves:Courtesy Pentax
Top red suction valve when pressed sucks water/air through the tip of the scope. This channel is connected to the accessory/biopsy channel. So if biopsy cap is missing you will not get any suction.
Bottom blue air/water valve has got a hole in it. When you switch on the air/water pump air hisses out of this valve all the time. Silence will tell you the pump is not on. Covering the central hole will blow air through the tip of the scope and inflate the lumen. Pressing the valve fully down on the other hand washes the lens with water.
The grip section- the ID of the scope
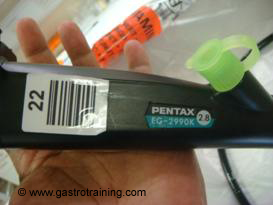
Picture 7: Grip section of Pentax scopes
- Instrument channel port with biopsy valve at the lower end of the grip section
- A sticker showing the number ( 22 here ) as the scope is identified in that particular trust ( it is the scope’s pet name)
- Colour code: blue means the biopsy channel diameter is 2.8mm, orange colour means channel diameter is 4.2mm ( i.e. therapeutic scope)
- Model number
- First letter identifies whether a scope (F=fibre optic, E=Electronic or Video)
- Second letter identifies type of scope (G=gastrtoscope, C=colonoscope, S=sigmoidoscope, D=duodenoscope, B=broncoscope, CY=cystoscope)
- Next two numbers identifies the external diameter of the insertion tube in French. ( 1mm=3F)
- Next numbers/letters ( 90K here in picture) identifies the series of the Pentax endoscope series ( K series stands for colour chip system of which 90K is the latest series and 90i is the latest technology ( Hi line HD system)
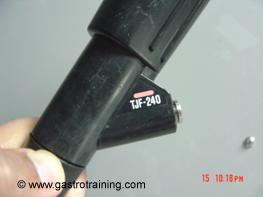
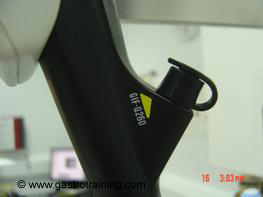
Picture 8: Grip section of Olympus scopes
On Olympus scopes the writing are GIF Gastrosintestinal scope CF= colonoscope PCF= Paediatric colonoscope TJF= Therapeutic jejunoscope ( Duodenoscope) ( where F stands for fibreoptic scopes)
Colour coding means – Orange=therapeutic Yellow = Normal Blue=Paediatric
Picture 9: Twin channel therapeutic scope with two accessory ports is very useful in patients with GI bleed.
Normal gastroscope tip is usually 10mm, paediatric gastroscope is 5mm- channel diameter 2.8mm and in paediatric is 2.0mm. Remember the therapeutic scope tips are thicker and sometime it would not take a banding barrel ( eg six shooter) and you will have to use a normal gastroscope.
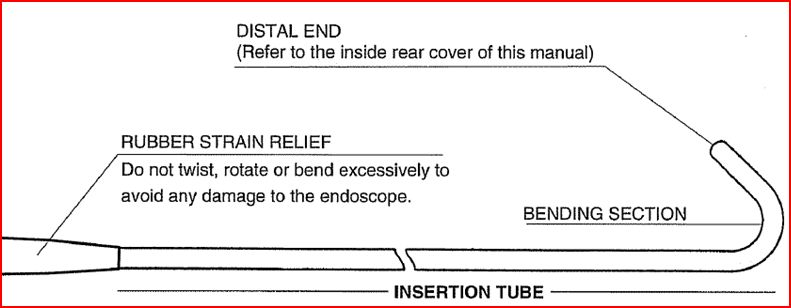
The tip of the endoscope

Picture 10: Insertion tube and the tip of the scope:Courtesy Pentax


Picture 11: 7 things at tip! :Courtesy Pentax
- Hollow instrument channel- big black hole
- First light guide
- Second light guide
- Objective lens in the middle,
- Air nozzle
- Water nozzle
- Water jet nozzle ( remember water introduced with a syringe through the forward water jet connector comes to this port and gives more powerful blast of water)- the smaller black hole
The connection to the processor- for PENTAX
Universal cord (umbilical cord or light guide connector) going to the processor. The expanded end ( called the PVE connector/the light guide section) contains

Picture 12: The Light guide section of a Pentax endoscope( Looking from the left)-
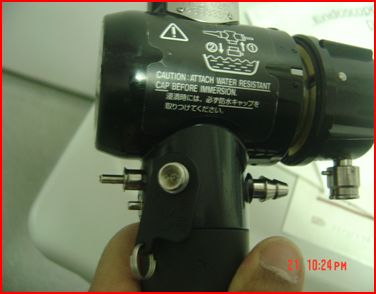
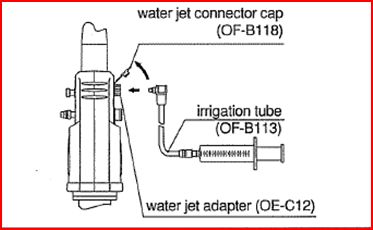
Additional forward water jet connector inlet port ( few nurses/doctors know about it- advantage is when there is an accessory in the biopsy channel you can easily wash without having to remove the accessory)- next to the fingers (which allows connection of special irrigation tube for spray of water to endoscopically visualized object)
Air/water inlet port to connect tube from water bottle assembly) ,
Venting connector (This port accepts the leak tester)- below the Air/water inlet port and
Light guide – the long metal prong on the left
The soaking cap in the picture above is covering the electrical pins which conveys the picture from the tip back to the video processor.

Picture 12a: The electrical head


Picture 13: Different water source: Courtesy Pentax

Picture 14: Looking at the PVE end from the right side:
First metal point ( top left) is Feedback connector( to attach earthing cable in case of interference in old style diathermy unit- never seen being at present- Olympus equivalent is S-cord mount ),
Suction port,
Venting connector- below the suction nozzle ( for leak testing)and
Light guide ( carries light from light source to the tip of the scope) respectively.
That’s how it looks after being connected to the video processor/light source. Remember for Pentax the video processor and the light source are housed in the same box ( unlike Olympus)


Picture 15: Connection of a Pentax endoscope: Water bottle needs to be filled to proper level
The connection to the processor- for OLYMPUS


Picture 16:The PVE end
Water/ air tube attachment ports ( left hand side- two separate prongs unlike Pentax and no additional water source port unlike Pentax)
On top there is the S-mount- ( to attach earthing cable in case of interference in old style diathermy unit- never seen being at present- Pentax equivalent of feedback connector)
On the right side is the suction port
The soaking cap on the right side is covering the electrical pins – unlike Pentax it goes to the video processor box ( which is a separate box on top of the light source box) via a curly cable with a cap
Note the venting port is part of the soaking cap- needed for leak testing ( in Pentax venting port is situated on the under surface of the PVE)
The two prongs ( light guide – long one and air pipe – short one) shown below goes to the bottom box- i.e. light source


Picture 17: The light guide connector section in a Olympus scope: Courtesy Olympus


Picture 18: The light guide connector section in a Olympus scope :Note the electrical connector does not go directly to the processor but attaches to the top light source box via a curly cable with a cap ( hand holding the cap)
The internal channels:
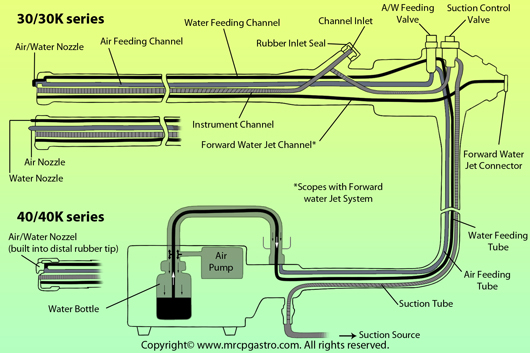
Picture 19: The diagram showing the internal channels: Courtesy Pentax
It is important to understand the internal channels.
- As you can see the air pump pushes air/water from the water bottle and the air escapes through the hole in the air/water valve on the control section
- When the hole is covered with a finger the air cannot escape and flows through the channel and comes out through the tip inflating the lumen- that’s why it is important not to rest your finger on that valve.
- When the valve is depressed fully the air circuit is cut off and then water from bottle flows in the channel in stead.
- The air and the water hole at the tip of the scope can be on the same point or placed separately
- On the other hand the suction channel is connected to the biopsy channel and there is no separate suction hole at the tip of the scope- so if the biopsy valve is torn ( passage of a biopsy forceps) you do not get good suction. You also do not get good suction if an accessory is blocking the biopsy channel for the same reason.
Here is the link for Parts of an endoscope video:
Acknowledgement/Bibliography:
Product guides of the respective companies- Pentax and Olympus