


PEG tube insertion
The module covers:
- Before you even start
- Different types of PEG tubes
- How to do it
- Aftercare
- How to remove a PEG tube
- What to do when PEG tube falls out
Before you even start
- Patient must have seen a dietician, SALT team and a gastroenterologist –all of whom along with the patient/carer must concur that PEG insertion would be in the best interests of the patient
- Take consent- use form 4 if unable to consent and the placement is felt to be in the best interests of the patient
- The patient should be NPO for at least 4 hours
- Antibiotic prophylaxis with a single shot IV antibiotic an hour before the procedure
- IV sedation if needed
Different types of PEG tubes
- The main difference between types of tubes are the type of the gastric retaining devices- collapsible e.g. Corflo and non collapsible e.g. Freka. The non collapsible PEG is removed with help of endoscopy whereas the collapsible ones are removed transcutaneously.
- Size of the tube- French or Charriere- CH 12/14/16/18/20. The narrower the gauge the better is the patient tolerance ( 1F=0.3mm eg 12F=3.6mm)
How to do it
- Percutaneous endoscopic gastrostomy is performed in a supine position and requires two operators, one for endoscopy and one for tube insertion
- After the endoscope has been passed into the stomach turn the patient on the back
- Locate the position for insertion of the PEG tube on the anterior abdominal wall by: a. Transabdominal impulse- endoscopically visible bulging when assistant presses the wall. b. Diaphanoscopy i.e.transillumination of the endoscopic light through the abdominal wall at the puncture area. However, lack of diaphanoscopy is no longer a contraindication for PEG tube insertion. c. Negative needle aspiration test (using a syringe containing 5ml saline solution, puncture under continuous aspiration towards the air-filled stomach without prior air aspiration) is safer than an adequate diaphanoscopy
- A mark is made on the abdominal wall once a site is chosen by firmly pressing a needle cap.
- The assistant can stand on either site with the instrument trolley next to him/her.
- The chosen puncture site is cleaned extensively using aseptic technique
- Inject local anaesthetic through all layers of the abdominal wall, slowly advancing the syringe into the gastric lumen- air is aspirated from stomach lumen
- Make a stab incision of approximately 3 mm for tube size CH 9, 4-5 mm for tube size CH 15 ( blue) or 6-7 mm for tube size CH 20 into the skin
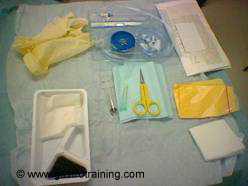
Picture1 and 2: The trolley and the actual kit for Freka PEG - Advance the puncture cannula into the stomach under direct endoscopic view
- Then remove puncture needle from the cannula
- The safety air valve automatically closes the lumen of the cannula as soon as the needle is taken out
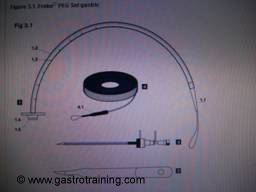
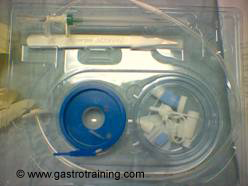
Picture 3 and 4: The different pieces inside the kit: Courtesy Fresenius Kabi - By this time the endoscopist has introduced the endoscope into the stomach and introduced a snare through the biopsy channel.
- Attach the blue introducer device to the plastic cannula and advance placement wire (double thread) into the stomach quickly and remove the introducer device immediately, otherwise stomach will deflate
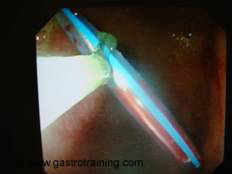
Picture 5: The snare over the plastic sheath- has to be repositioned so that it catches only the placement wire leaving the plastic sheath - As soon as the placement wire (double thread) is visible in the stomach catch it with a snare
- Steady the snare/biopsy forceps with respect to the endoscope and pull out everything through the mouth Picture 6: Looping the loop
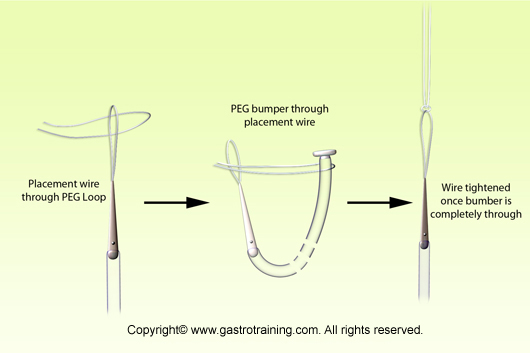
- Fix the loop the PEG tube with the loop of the placement wire (double thread) in an interlocking fashion and smear the PEG tube with liberal amount of KY jelly before introduction ( first put placement wire through PEG tip wire loop and then pass the PEG bumper through the placement wire loop and pull the bumper out to lock the two loops together)
- Now pull the guiding thread through the puncture cannula with your left hand, and at the same time guiding the lubricated PEG tube through the mouth with the right hand
- When the tip of the PEG tube reaches the puncture cannula, a resistance will be felt. At this point, remove the puncture cannula and further pull will bring out the conical end of the PEG tube through the incision
- Pull the PEG tube through the abdominal wall until the inner retention plate abuts the inner gastric wall
- Pull on the tube until elastic resistance is felt and keep under tension
- The inner retention plate should be able to be rotated freely and there is no need to check the retention plate by reintroducing the endoscope
- Cut the guiding thread of the PEG tube close to the cone
- Pass the conical end of the PEG tube through the hole of the fixation plate and then through the tube clamp
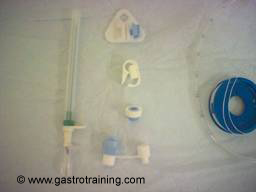
Picture 7: Fixation of the outer retaining device and rest: Courtesy Fresenius Kabi - Close the tube clamp and then cut off the cone of the tube
- Push the end of the tube through the fixing screw and then push the pin of the Luer-Lock connector as far onto the tube as possible and secure it by turning the fixing screw
- Pull off the screwing aid (outer white ring) in a downward direction and discard the white ring.
- Clean and dry the puncture site, fixation plate and tube thoroughly
- The fixation plate should be snugly fitted to the abdominal wall and should remain under moderate tension for 24 hours to promote good adaptation of the stomach wall to the abdomen the wall. Keep a record of the mark at abdominal wall ( normally 3-4cm)
- After 24hours, the tube should be loosened. Leave 5 mm free play between the skin and the fixation plate.
- For intra-gastric feeding a fasting period after peg placement of at least 1-2 hours is recommended. Some authorities suggest fasting period of 6-8hours to prevent chance of peritonitis.
The variation for a Corflo PEG
- The retaining device for a Corflo PEG is collapsible so that it can be pulled out after cutting the tube few cm outside of the abdominal wall.
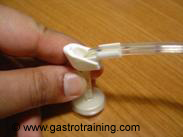
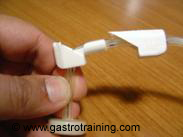
Picture 9: Fixing the outer retaining device of the Corflo PEG - The first piece of the outer retaining device has got a 90 degree bend and the PEG tubing is pressed into the groove of it the second piece is pushed into the first piece
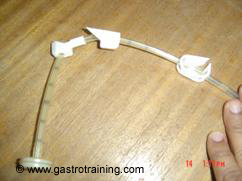
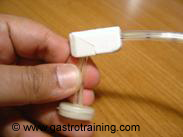
Picture 10: The sequence of different pieces for the Corflo PEG - The sequence of the inner retaining device, two piece outer retaining device and quick release clamp
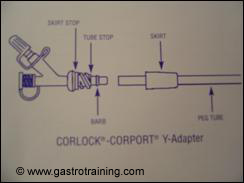
Picture11: The CORLOCK-CORPORT Y Adaptor : Courtesy Merck Serono - Untwist the skirt from the Y adaptor (CORLOCK-CORPORT Y adaptor )and pass the PEG tube through the narrow end of the skirt
- Push the PEG tube onto the barbed end of the Y-adaptor
- Push the skirt onto the Y-adaptor
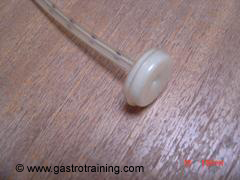
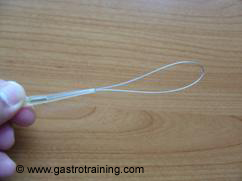
Picture 8: Inner retaining plate of the Corflo PEG: Other end with the loop
Aftercare
- Ideally before the first feed is started the patient should be seen by the dietician who explains it to the patient or the carer.
- For daily cleaning -loosen the clamp device of the outer fixation plate and pull back the fixation plate
- Carefully clean the puncture site, the tube and the underside of the fixation plate and let the puncture site dry properly
- Push the tube carefully 3-4 cm into the stoma and rotate through 180 degrees every time the dressing is changed. At least once a week but no more than once a day. It is important for the tube to move freely in the stoma to prevent the retention plate becoming embedded(buried bumper syndrome)
- Then pull and that you gently until resistance is felt, and push the fixation plate back to snugly fit to the skin with a free play of 5mm.
- During the first wound healing phase, the dressing should be changed daily; after that, the frequency of dressing changes will depend on the condition of the site in question (approximately every 2-3 days)
- The puncture site should rechecked by a health care professional at least once a day in the first week after the tube has been positioned.
- In any case, the dosage of the feed should be increased gradually. For pump controlled continuous tube feeding, which is the preferred method, always use the enteral feeding pumps which are commercially available
How to remove a PEG tube
Notes on Freka PEG tube removal (needs endoscopic removal)
- Insert the gastroscope into the stomach
- The assistant cuts off the luerlock adapter and remove the tube clamp and the outer fixation plate
- Advance the tube into the stomach slightly
- Catch the inner retention plate with a snare and cut the tube off at level with the abdominal wall and pull the inner plate with rest of the tube out with the gastroscope
- Then apply an adhesive dressing. Patient can eat immediately after removal of a PEG tube.
- Some trusts cut the Freka PEG tube close to the skin and push it into the stomach (this method should not be used if there is any suscpicion of distal stricturing ) and expect the inner rigid retaining device to be passed per rectum in due course (not advised by the company)
Notes on Corflo PEG tube removal (does not need endoscopy for removal)
- Remove the fixation device
- Make sure the inner bumper is rotating freely before pulling the tube
- Cut the tube 4-5 inches away from the abdominal wound (this also cuts a small capillary tube inside the tube which deflates the inside bumper
- Pull the tube out while stabilizing the exit site with fingers
- The hole should close in 24hours
What to do when PEG falls out
- The tract even it is established can close very fast (within 4 hours)- so to maintain the patency at least a similar French size Foley catheter needs to be inserted into the stomach.
- Do not use anything more than mild pressure to insert a Foley’s catheter
- Then later when available either change that to a replacement balloon PEG which can be inserted at bedside ( easy and quick but short lifespan and needs change) or endoscopic reinsertion of PEG (needs endoscopy but long life) or a RIG tube (radiologically inserted gastrostomy) can be placed without the need for screening ( advantage of non-balloon collapsible inner retaining device and no need for endoscopy and longer life compared to replacement balloon PEG)
- Don’t confuse replacement balloon PEG with low profile button PEG ( which is normally used for cosmetic reason)
- If there is a tract but uncertainty where that is leading up to – guidewire can be inserted with caution and a PEGogram obtained to confirm intragastric location.
Complications of PEG insertion:
- Intraabdominal wall abscess
- Necrotising fasciitis
- Peritonitis
- Colonic perforation
- Haemorrhage
- Localised infection
- Leakage or blockage of the tube
- Pressure necrosis
- Mucosal overgrowth around the gastric retaining device
Here is the link for PEG insertion video:
Further reading: Indications, Insertion, Trouble shooting, Buried Bumper Syndrome and Patient information
Acknowledgement/Bibliography:
- Guidelines for enteral feeding in adult hospital patients : BSG 2003
- Angus F et al. The percutaneous endoscopic gastrostomy tube. Medical and ethical issues in placement. Am J Gastroenterol 2003; 98: 272-277
- Korula J et al. A simple and inexpensive method of removal or replacement of gastrostomy tubes. JAMA 1991; 265:1426-28
- Product guide of the respective companies- Fresenius Kabi and Merck Serono
