


Oesophageal stricture dilatation – TTS balloon
The module covers:
- When to use balloon dilatation
- What is a TTS balloon
- How to assess the length of the stricture
- How to set it up
- Which size of balloon to choose
- How to actually use it once it is set up
- Situation when stricture is impassable with scope- the need for screening
- Aftercare
- Titbits
When to use balloon dilatation
- It is normally used to dilate benign oesophageal strictures- eg peptic stricture, post operative stricture, post radiotherapy stricture, corrosive injury related stricture.
- This is not used for dilatation of achalasia – a separate Achalasia balloon is used.
- Malignant strictures are treated with self expanding metal stents rather than by dilatation as risk of oesophageal perforation is high.
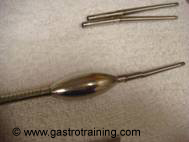
What is a TTS balloon
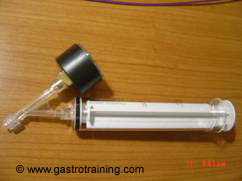
- CRE ™ ( controlled radial expansion ) wire guided Balloon Dilatation Catheter (Boston Scientific) is commonly called TTS ( Through the scope) balloon
- It is capable of being inflated to three distinct and progressively larger size diameters depending on the inflation pressures.
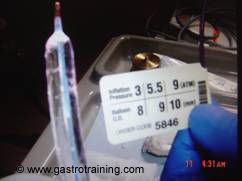
Picture1 and 2: Higher ATM will produce greater dilatation: ATM is shown on the outer dial - It is designed to pass through the working channel of an endoscope and accept a guide wire through it’s lumen
- Standard sizes are
- 8-9-10mm
- 10-11-12mm
- 12-13.5-15mm
- 15-16.5-18mm
- Usually length of balloon is 5cm and is same for different balloons and they differ only in the post inflation diameters.
- While choosing the size, remember a standard gastroscope tip is 10mm diameter and if cannot pass the stricture then oesophageal lumen is less than 10mm.
- It will come with a guide wire is situ
- Confirm the blue guide wire tip is positioned inside the transparent catheter tip and move the locking device switch to ON position. This will prevent guide wire movement during the scope introduction.
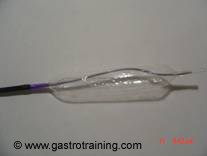
Picture3 and 4: The blue guide wire is visible just inside the tip of the balloon: The guide wire is seen protruding from guide wire port; the white lock is on, so that wire will not move - Once endoscope is in position if you want to use the guide wire make sure the locking device switch is in OFF position and then you can advance the guide wire through the stricture.
- But very often, a separate jagwire is used rather than the guide wire supplied, particularly in impassable strictures when the lumen is not clearly visible distal to the stricture ( radiological screening is mandatory in these cases)
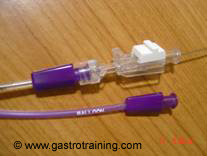
- The balloon hub of the catheter is attached to an integrated inflation system such as ALLIANCE™ or other 60cc inflation device with a gauge to monitor the balloon pressure.
- Confirm the blue guide wire tip is positioned inside the transparent catheter tip and move the locking device switch to ON position. This will prevent guide wire movement during the scope introduction.
- And during the passage of the balloon through the biopsy channel spray the outside of the catheter with silicone gel and suck the balloon in.
- Do not test the balloon- it might not pass through the channel then.
- Bougies use shearing force rather than radial force and are infrequently used for dilatation.
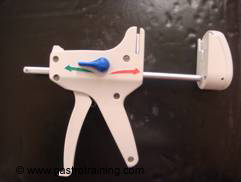
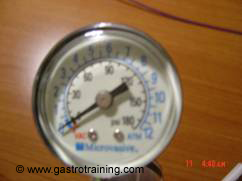
Picture5 and 6: The Alliance single use syringe/Gauge assembly: The actual inflation device- blue knob to green arrow will allow inflation, blue knob to red arrow allow deflation while if it is vertical the piston moves freely either way- position when you initially fix the filled syringe to the inflation device
How to assess the length of the stricture
- If you can pass the stricture it is easy to calculate.
- If not- to get an idea about the length of the stricture – under fluoroscopy measure the distance between the tip of the endoscope (keep it the level of the stricture) and the stomach air shadow. The diameter of the normal gastroscope tip is 10mm
- It is better to squirt some contrast above the stricture and delineate the whole length.
- It is unusual for the benign strictures to be very long.
- Remember the length of balloon is fixed and is 5cm and is same for different balloons and they differ only in the post inflation diameter.
What do you need
- You will need different sized CRE balloons
- The inflation device
- The Alliance single use syringe/Gauge assembly ( it includes a 50ml syringe to be filled with water ( or contrast if screening is needed)
Which size of balloon to choose
- Remember the tip of a normal endoscope is roughly 10mm- if it does not pass start with a 8-9-10mm CRE TTS balloon
- Although unless you inflate to the manufacturer’s recommended pressure 3ATM for 8mm dilatation, 5.5ATM for 9mm dilatation and 9ATM for 10mm dilatation the balloon diameter will not be what you are hoping
- However most gastroenterologists stay below the limit. Be guided by the radiological waist ( how much of the ‘predilatation waist’ is gone) and repeat the procedure at a later date rather than be aggressive.
How to actually do it
- Pass the endoscope up to the point of stricture
- Pass the CRE balloon catheter through the biopsy channel after spraying the outside with silicone gel and sucking the balloon flat.
- The assistant will prepare the device by
- Aspirating water in the syringe up to the red mark and fit in the inflation device
- Connect the balloon port of the catheter to the inflation device
- Pass the half of the length of the balloon through the stricture
- Keep the guide wire locked in and make sure it is inside the tip of the balloon- it is quite stiff and gives the balloon some stiffness.
- Once the balloon is across the stricture you can remove the wire after sliding the white locking device to off position
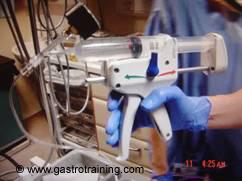
- The assistant will inflate the balloon with water by squeezing the inflation device repeatedly
- Blue knob to green arrow will allow inflation, blue knob to red arrow allow deflation while if it is vertical the piston moves freely either way- position when you initially fix the filled syringe to the inflation device
Picture7: Before you start inflating the blue knob to be turned to green arrow - Maintain the endoscopic view of the balloon all the time
- At first fill it only partially to make sure the balloon is sitting across the stricture i.e. to catch the stricture
- Then increase the pressure gradually noting the manometer reading.
- This is the time when the balloon might slip- called cone effect.
- The balloon will slip upwards if the major portion of the balloon happens to be above the stricture( then maintain inward push on the balloon catheter )
- The balloon will slip downwards if the major portion of the balloon happens to be below the stricture (then you need to exert outward pull)
- Each balloon will pass through 3 different diameter depending on inflation
- Remember not to dilate it too much in one endosocpy session
- Keep the pressure on for 60 secs – if pressure falls ( say from 3 ATM to 2ATM as the stricture dilates ) –and increase it back to the pressure of 3 ATM.
- After successful dilatation try to go through the stricture and have a careful look. Minor mucosal tear and slight bleeding is expected.
Situation when stricture is impassable with scope- the need for screening
- When the stricture is impassable but it is a very short segment stricture and you can clearly see the lumen distally – you can proceed as above
- Other than that the dilatation needs to take place under radiological screening according to the following steps
- Here you might need an additional three way tap and a 20ml syringe filled with contrast solution and use it as follows
- Introduce the scope up to the point of stricture
- Introduce a white tube/ ERCP cannula through the biopsy channel so that it’s tip rests just above the stricture
- Pass the guide wire through the white tube/ERCP cannula and then through the stricture
- Advance the white tube over the guide wire
- Remove the guide wire and inject contrast and screen to make sure the white tube is in the stomach
- Reintroduce the guide wire and withdraw the endoscope and the white tube by pull/push technique leaving the guide wire in.
- Introduce the TTS balloon over the guide wire and simultaneously introduce the endosocpe along side up to point of stricture
- Advance the balloon through the stricture
- Inflate the balloon with contrast after catching the stricture with the balloon – two ways it can be done- either normally by the inflation device or better in the following way
- Inflate the balloon with contrast by inflating from the 20ml syringe fitted to the TTS balloon catheter via a three way tap
- In this way the balloon will catch the stricture easily rather than by the slow inflation with the inflation device
- Once you think you got the stricture, change the three way tap to the inflation device and start inflating again
- Rest is similar to the procedure without the screening but here you keep a careful eye on the screen and look for the stricture and gradual dilatation. Sometime a residual waist will remain in first attempt at dilatation for very tight strictures.
- If dilatation is successful it is expected that you will see blood and minor mucosal laceration
- Inject contrast proximal to the stricture and look for any leak
Aftercare:
- CXR after 2-4hrs to exclude oesophageal perforation- this is not routine practice particularly if straightforward procedure and post dilatation visual check and contrast check is ok but is a safe practice.
- If OK patient can eat and drink
- Admit the patient if subcutaneous emphysema, persistent or worsening pain and evaluate for perforation
- Follow up in clinic to assess the response- prefer to calculate a dysphagia score pre and post procedure
Titbits:
- Previously Eder-Peustow dilatation olives or Savary-Gillard dilators ( Wilson-Cook) was standard- which exerts an unnecessary longitudinal shear force on top of radial dilatation force but has the advantage of tactile sensation of the feeling of resistance which acts as a safeguard- no good evidence that these are more dangerous or less effective than the TTS dilator.
- The TTS balloon dilatators are standard these days but these does not provide any tactile feedback.
- With these dilators the rule of 3 is- do not more than three consecutive dilatation at 1mm increment
- Remember 1F=0.3mm eg 7F=2.1mm
- Lumen of 13mm is enough to relieve the symptom of dysphagia
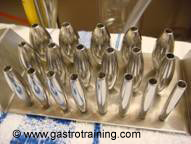
Picture8 and9: Eder-Peustow dilatation olives on flexible shaft
Picture 10: Savary-Gillard PVC dilators
Here is the link for Oesophageal stricture dilatation video:
Acknowledgement/Bibliography:
- Tytgat GN. Dilation therapy of benign esophageal stenoses. World J Surg 1989; 13:142-148
- Marks RD et al. Peptic strictures of the esophagus. Am J Gastroenterol 1993; 88:1160-1173
- Scolapio JS et al. A randomized prospective study comparing rigid to balloon dilators for benign esophageal strictures and rings. Gastrointest Endosc 1999; 50: 13-17
- Product guide of the respective companies- Boston Scientific
