Endoscopic treatment of gastric varices using histoacryl® (cyanoacrylate) glue
The module covers:
- When to use Histoacryl glue
- What is Histoacryl glue
- How to prepare the glue
- How to actually use it once it is ready
- What are the complications
When to use Histoacryl glue
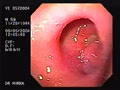
It is used to inject in the gastric varix to achieve haemostasis in case of acute bleeding.
Gastric varix occur in 20% patients of portal hypertension and risk of gastric variceal bleeding varies from 55% to 78% with a bleeding related mortality rate of 45%
It is tissue glue and can be issued to glue cut surface e.g. small incised wound in place of steristrip.
What is Histoacryl glue
Histoacryl® is an acrylic resin (N-butyl-2-cyanoacrylate) which rapidly polymerises in the presence of water joining the bonded surfaces together. It is available in 0.5ml ampoule.
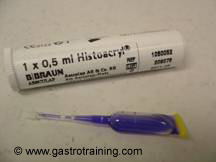
Picture1: Histoacryl® glue
It is diluted in Lipiodol as it does not affect polymerization of cyanoacrylate and allow imaging should it embolize in the rare event.
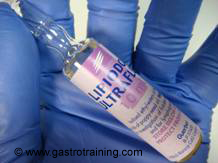
Picture2:The diluent Lipiodol ultrafluid 100%v/v
How to prepare the glue
- Wear protective eye goggles and gloves.
- Draw 1ml of Lipiodol in a 2ml Luer lock syringe ( Lipiodol comes in 10ml ampoule)
- Use of Luer lock syringe is preferable as it is quite hard to push the glue through the injection needle and there is a chance that the syringe can come loose from the injection needle spraying the glue everywhere.
- Before you snap open the tip of the Histoacryl ampoule hold it vertically and tap the narrowed tip so that the solution settles in the bottom
- Next draw the whole ampoule (0.5ml of Histoacryl® ) of glue in the same syringe and gently shake
- The glue has to be freshly made immediately before the injection into the varix.
- Keep acetone handy as it is only dissolvable in acetone.
How to actually use it once it is ready
- Use Large channel gastroscope (3.7 or 6mm working channel)
- Prime the injection needle with 2ml of Lipiodol (some centre uses saline) to prevent injection of air into the varices and also to prevent glue settling in the gastroscope. Some centres use saline only.
- It is preferable to use bigger bore injection needle (19G) as the glue mixture is very viscous and very hard to inject. Some centre uses injector needle with metal body/sheath rather than plastic body/sheath
- Keep few 2ml syringes ready loaded with water for injection and 2-3 of 2ml syringes ready loaded with the glue mix.
- Glue injection is usually done in retroflexed view. Once the needle is in the varix inject the glue mix. Remember once the syringe is empty, all the glue is still sitting in the injector needle (volume of the glue mix is 1.5ml and injector needle volume is 1.5-2ml)
- Follow immediately with 2ml of water for injection flush to drive the glue mix from the lumen of the injection needle into the varix.
- Withdraw the needle from the varix and flush another 2ml of water into the gastric lumen before withdrawing the needle back into the sheath- to prevent any glue mix from being left in the needle and occluding the needle or gastroscope.
- Do not wait for the glue to solidify in the varix and then withdraw the needle for the fear of the hole made by you hosing- that might cause the needle to stick – forceful removal will result in de-roofing of the varix.
- Withdraw the needle from the varix while assistant keeps flushing saline after the whole glue mix has been injected.
- In event of the needle getting stuck in the varix- simply withdraw the needle into the sheath- keep the sheath attached to the varix. Cut the needle outside the scope and withdraw the scope. Subsequent management is not clearly defined – but watchful expectancy would not be a bad idea!
- After the glue is injected prevent any temptation to suction. It is better to remove the suction button to avoid inadvertent suction of glue in the suction channel.
- Limit each injection to 1ml to prevent embolism but can be repeated to completely obliterate all the tributaries.
- Obliteration of the varix can be checked by probing with the injection needle when obliterated varix will feel firm whereas normal varix will feel spongy.
- Because of fear of injection needle sticking to the scope, some centres practice withdrawing the scope with the needle in situ and the cut the tip of the needle outside before withdrawing the needle out of the scope.
- Reported initial haemostasis rate of 87% to 100% with rebleeding rate ranging from 24% to 50%.
What are the complications
- Complication associated with Histoacryl® injection are embolism, sepsis, fistula and adherence of the needle to the glue within the varix
- Damage to the scope if glue settles down in the biopsy channel fixing the injection needle to it
Here is the link for Intravariceal Cyanoacrylate (Histoacryl ) injection video
References/ Acknowledgement
- Seewald S et al: A standardized injection technique and regimen ensures success and safety of N-butyl-2-cyanoacrylate injection for the treatment of gastric fundal varices (with videos): Volume68,No3:2008 Gastrointestinal Endoscop
- Sohendra N et al: Endoscopic obliteration of large oesophagogastric varices with bucrylate.Endoscopy 1986: 18:25-6
- Jalan R et al: UK guidelines on the management of variceal haemorrhage in cirrhotic patients. Gut; 46 (suppl III)
- Poole hospital protocol for treatment of gastric varices using Histoacryl® glue