


Pneumatic dilatation of Achalasia
The module covers:
- The basic principle of achalasia dilatation
- The common devices used
- How to actually do it
- Aftercare
Choosing the correct patient
- If you cannot pass the endoscope beyond the narrowing at GOJ , reconsider your diagnosis and consider pseudo-achalasia
- A thorough endoscopic examination is important, with particular attention given to the GOJ, where malignancy can simulate achalasia (pseudoachalasia).
- It is very important that your diagnosis of achalasia is quite firm ideally with endoscopic, Barium swallow and manometry findings.
- Quite high risk procedure (5% chance of perforation)- so discussion in the clinic with the patient is important while discussing the alternatives (Laparoscopic cardiomyotomy)
- These patients are prone to aspirate particularly when regurgitation of old food is the predominant symptom.
- The patient is advised to fast for at least 12 hours prior to the procedure +/- liquid diet for one or two days preceding the dilation
Procedure
Choice of balloon
- A 30 mm balloon is used for a first dilatation. Subsequent dilatation may involve larger balloon- 35 and 40cm.
This are quite big sized balloon compared to standard stricture dilatation balloons- the idea being to rupture the muscle fibres. - Inflate the balloon before use to check for any leaks
- We describe the OTW ( over the wire) achalasia balloon from Rigiflex™ II ( Boston Scientific)
- Another frequently used balloon is Wilson-Cook
- Another alternative is reusable balloon (shown below)
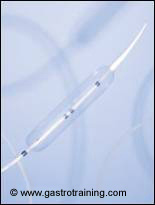
Picture1: RigiflexII achalasia dilatation balloon: Courtesy Boston Scientific
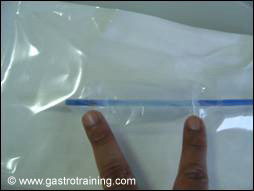
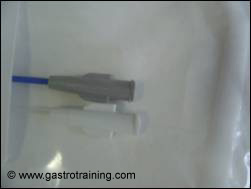
Picture2 and 3: Wilson-Cook achalasia dilatation balloon and the inflation and luminal port
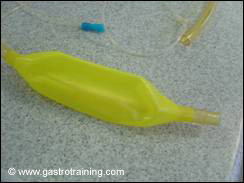
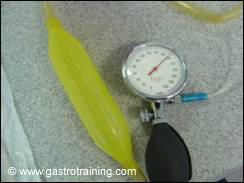
Picture4 and 5: Reusable achalasia dilatation balloon with the pressure gauge: the endoscope goes through the top end of the yellow tube and comes out below the balloon
Positioning the balloon across the LOS
- A guidewire is passed through the biopsy channel of the endoscope into the stomach and the scope is withdrawn to the GOJ.
- Note the distance between the incisors and the GOJ along the length of the scope.
- The endoscope is then removed (taking care to maintain the position of the guidewire in the stomach- push/pull technique).
- As an aid in initial placement, a marker (such as a paper tape/ tippex) can be placed on the shaft of the dilating catheter to correspond to the previously noted distance from the incisors to the GOJ.
- This distance should be measured from the middle of the balloon on the dilating catheter.
- The balloon and tip of the shaft is lubricated and passed over the previously placed guide wire until the marker is in place at the incisors- that means the midpoint of the balloon is now at GOJ.
Actual dilatation
- Using fluoroscopy, the balloon is then gradually inflated with air, noting the position of the developing waist.
- Inflation is achieved with a 50ml syringe attached to the balloon port with a 3 way stopcock ( one end to catheter, second to syringe and third port to the pressure gauge)
- The balloon is inflated with air
- Small adjustments usually have to be made in the position (deflating the balloon each time) to ensure that the waist occupies the centre of the balloon- balloon will slip downwards if you are too down and then you will have to exert a pull upwards and vice versa- called the cone effect
- After a satisfactory position is obtained, the balloon is fully inflated (usually requiring about 120 mL of air).
- The required pressure will be specified on the moulded junction- average 7-15 PSI
- The balloon is kept inflated for 60 seconds, during which patients may be very uncomfortable- give pethidine or fentanyl 2 minutes before the dilatation
- After the 60 seconds are over, the balloon is rapidly deflated.
- Sudden disappearance of the waist is very suspicious of rupture
- Thereafter, perform another full inflation for 60 seconds and again note the pressure required to obliterate the waist. This is usually less than the initial pressure
- Another alternative is reusable balloon-
- The scope here is passed through the balloon and then the scope is introduced beyond GOJ- a J manoeuvre confirms part of the balloon beyond the GOJ ( see picture)
- The side catheter containing the inflation port is attached straight to a inflation device with a pressure gauge ( see picture)
- Pressure of 200mm kept for 2minutes and then release
Aftercare:
- The patient is observed for the next five to six hours during which serious complications, such as perforation would be obvious
- Routine post procedure CXR is advisable
- Follow up in clinic to assess response
Here is the link for achalasia dilatation video
Acknowledgement/Bibliography:
- Khan AA et al. Pneumatic balloon dilatation in achalasia: a prospective comparison of balloon distention time. Am J Gastroenterol 1998; 93:1064-1067
- Kadakia SC et al.Graded pneumatic dilation using Rigiflex achalasia dilators in patients with primary achalasia. Am J Gastroenterol 1993; 88:34-38
- Barkin JS et al.Forceful balloon dilation: an outpatient procedure for achalasia. Gastrointest Endosc 1990; 36: 123-125
- Product guide of the respective companies- Wilson-Cook and Boston Scientific
