


Know your endoscope
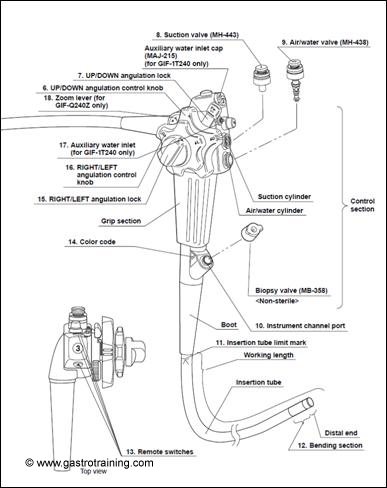
Image 1: The different parts of an endoscope: Courtesy Olympus
An endoscope has 3 main sections
The Insertion tube
- Flexible shaft: This is the part of the endoscope that transmits the push, pull and torque forces to the tip. It is susceptible to looping particularly during colonoscopy. Recent innovation with the now commonly available variable stiffness and the new overtube ShapeLock Endoscopic Guide (ShapeLock, USGI Medical, San Clemente, CA) has allowed endoscopist more control in preventing looping and reducing discomfort to the patient.
- Bending section: This allows manoeuvrability of the tip with movements up, down, left and right in response to turning the deflection wheels.
- Distal tip of an endoscope consists of :
- Instrument / Suction channel. This is at 5 o’ clock position (endoscopic view) in a colonoscope and 7 o’ clock position in a gastroscope.
- First & second light guide which act as a light source.
- Objective lens allows visualisation of the mucosa.
- Air nozzle to insufflate air.
- Water nozzle to clear the lens.
- Water jet nozzle- water introduced with a syringe through the forward water jet connector comes to this port and gives a more powerful blast of water.

Image 2: Distal tip of an endoscope courtesy Pentax

Image 3: Components at Distal tip Courtesy Pentax
The Hand piece
- Up/down deflection wheels (Big wheel): This wheel moves the tip of an endoscope up or down. In the endoscopic view big wheel down results in the endoscope angulating upwards and vice versa. To further confuse you in actual 3 Dimension the endoscope is actually bending downwards but due to the way the optics and the visual image are organized it seems to be in the opposite direction.
- Up/down deflection lock: It is the knob with F written on it. To lock your wheel one needs to turn in the opposite direction of the arrow. This allows the endoscopist to lock his wheel in a particular position. This is usually in the setting of endoscopic therapy/ targeted biopsy.
- Left/right deflection wheel (Small wheel): This moves the tip of an endoscope left or right. In endoscopic view small wheel down results in the endoscope angulating left and vice versa.
- Left/right deflection lock: It Locks the right and left deflection wheel.
- Blue Air/Water valve: This is used to control the insufflations of air or flush water to clear the lens. Covering its opening or partial depression feeds air from the distal tip. Full depression flushes water to clear the lens.
- Red suction valve: When depressed this aspirates air or fluid through the distal tip. This is connected to the accessory channel. A biopsy cap needs to be in situ covering the accessory channel for the endoscope to generate the suction needed.
- Accessory/Biopsy channel opening: This allows passage of biopsy forceps and other instruments to undertake therapy. This is covered by the biopsy cap which creates an air tight seal necessary for the suction channel to operate. Therapeutic endoscopes such as on the image on the right may have 2 accessory channels. These allow multiple instrumentation and are useful in therapeutic settings eg GI bleed therapy.
- Remote Video buttons: There are 4 buttons numbered as such. These allow the endoscopist to remotely control freezing/capturing images, video or activating narrow band imaging. In our unit the settings are as follows:
- Button 1: Freeze image
- Button 2: Activate/ Turn off Narrow Band Imaging
- Button 3: Start/ Stop video
- Button 4: Unfreeze image
- Forward water jet connector: This is rarely used and often forgotten but it is a useful adjunct when you want a water jet without removing the instrument in the accessory channel. This needs an irrigation tube to connect the syringe to it. The water jet comes out with force from the water jet nozzle in the distal tip.
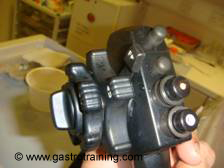
Image 4: View of the deflection wheels and locks (side view)
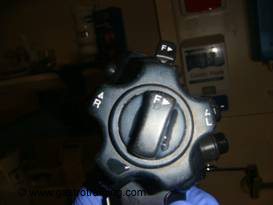
Image 5: View of the deflection wheels and locks (Front view)
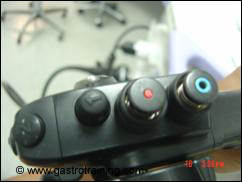
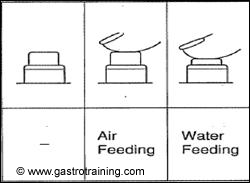
Image 6: The Valves Courtesy Pentax
Top tip #1 Trainees have a tendency to use the index finger and the ring finger each to control both the buttons simultaneously. This results inadvertently in the opening of the blue air/ water valve being covered resulting in uncontrolled insufflations. The result is a distended bowel with tight angulations and a very uncomfortable patient. It is recommended that just the index finger is used alternating between the two valves to avoid this scenario.
Image 7: Accessory/ Biopsy channel and biopsy cap.

Image 8: Forward water jet connector (Opening just left of the video button 1) courtesy Olympus
The Umbilical cord
This is made of a flexible tube housing all the channels. The end of the cord is expanded to connect to the processor (PVE connector) and houses the air/water port, suction port, leak test port, light guide and the electrical contact.


Image 9: End of the umbilical cord and connection to the processor courtesy Olympus.
There are differences in PVE connector of the umbilicus with the Olympus and Pentax endoscopes. (See images 9 & 10). The main differences are the electrical pins with their soaking cap are on the right of the PVE connector in an Olympus scope while it is at the back of a Pentax scope. Secondly the water jet connector is at the PVE connector of a Pentax scope and in the hand piece of the Olympus scope. They both have ports for Air water and suction although these are organised slightly differently in both.


Image 10: End of the umbilical cord and connection to the processor courtesy Pentax
