Oesophageal stent insertion
The module covers:
- What do you need
- Assessment of the stricture- choosing the length of stent
- Basic principles
- Choosing the stent
- How to choose the diameter of the stent
- How to deploy
- Aftercare
- Complications
- Titbits
What do you need
- Stent
- ERCP cannula and long guidewire (450cm)
- Lipoidol contrast
- Injector needle or simple paper clip attached to adhesive tape
- Paediatric gastro/colonoscope if available for impassable stricture
Assessment of the stricture and choosing the length of the stent:
- Ideally assess the length and anatomy of the stricture by direct vision if possible.
- Most centres that does frequent oesophageal stenting will have a paediatric endoscope.
- Paediatric gastroscope is usually 3mm diameter and paediatric colonoscope 7mm diameter and most of the strictures will allow these paediatric scopes to pass.
- You have to leave at least 2-3 cm above the top of the stent and the upper oesophageal sphincter ( cricopharyngeal )
- How to estimate the length of the stricture, if the stricture is impassable:
- Under fluoroscopy measure the distance between the tip of the endoscope (keep it the level of the stricture) and the stomach air shadow. The tumour normally then can be all the way down to the GOJ but more commonly a few centimetres only ( be guided by the CT Scan findings )
- Other techniques that can be used
- Once you opacify the stomach rugal fold by injecting the contrast through the ERCP cannula- withdraw while injecting and as it passes through the stricture it delineates the stricture.
- Inflate a biliary dilatation balloon 15mm and withdraws until it is stuck where the stricture begins.
- Mark the top end of the stricture with
- A metal clip taped to the bare skin at the proximal end of the stricture (fluroscopically)
- Or inject contrast intramucosally at the top of the stricture
- Put an endoclip at the top end of the stricture
- If you under estimate the length of the tumour then you might have to dove tail another stent through the first stent-so if in doubt go for the longer stent in the first instance.
- Stent should be 3-4cm more than the stricture length – 2cm above and 2cm below the stricture plus the stricture length, so for a stricture of 5cm the stent length would be 5+2+2= 9cm
How to assess the diameter of the stent
If adult gastroscope cannot pass the stricture , the diameter of the stricture is less than 10mm
Choose the diameter which is 1-4mm larger than the largest reference oesophageal diameter, to achieve secure placement
Standard stent is of 18mm diameter but if the scope can pass the stricture bigger diameter may be needed e.g. 22mm
Basic principles
When you can pass the stricture with the gastroscope
- Measure the actual length of the stricture with paediatric/adult gastroscope and whether the GOJ is involved
- If using adult gastroscope inject Lipoidol contrast to tattoo the top and bottom of the stricture (for tattooing the lower end of the stricture you will have to do J manoeuvre )
- If using a paediatric scope to measure then introduce adult gastroscope to tattoo only the top of the stricture as it cannot take a injector needle through it’s biopsy channel
- After tattooing pass a jagwire into the stomach ( no need for white tube/ERCP cannula or injecting contrast into stomach)
- Some centres do not mark the lower end of the stricture with contrast if they can go through the stricture and some centres mark the top end with other devices ( see above)
If you cannot go through the stricture
- Mark the top of the stricture/tumour with Lipoidol contrast tattoo at the top only on two opposite walls ( or use other devices – see above)
- Pass a ERCP cannula first through the scope ( with a Jagwire through it with the soft tip) up to the beginning of the stricture- do not push the ERCP cannula through the stricture at this stage – it can perforate
- Push guide wire gently into the stomach under fluoroscopic screening
- Learn to identify the stomach shadow and the diaphragm on the fluoroscopy
- Push the cannula over the guide wire into the stomach under screening
- Inject contrast in the stomach to make sure you are in stomach- you might have to withdraw the cannula if it hits the gastric rugal folds.
- Keep injecting contrast as you withdraw the cannula until you delineate the whole stricture.
- Take ERCP cannula out keeping the jagwire in – pull/push exchange
- Once you are sure that the jagwire is in the stomach/duodenum take the scope out while pushing the guide wire in simultaneously ( left hand pulling out the scope holding the knob and right hand pushing the guide wire in
- The assistant at head end supports the end of the scope as it comes out the mouth so that it does not suddenly drop causing the jagwire to dislodge and when the scope is out of mouth , assistant will secure the jagwire and then remove the scope completely
Choosing the stent
- Type- covered and non-covered: advantage of non-covered stent is there is less chance of stent migration but more chance of stent blockage because of tumour ingrowth. Most gastroenterologists use partially covered i.e. non-covered at the end flanges or a sleeve of non-covered segment around the covered midsection (e.g. Niti-S)
- Top/proximal release or bottom/distal release: Most use bottom release but in case of high tumour top release may be preferable as it can be deployed with direct endoscopic visualization ( most companies produce both variety).
- Dimension – varies from 15-18-22mm diameter and 70-100-120mm length. Most common diameter used is 18mm. End flanges are wider and normally 23mm. Choosing the length has already been discussed above.
- Removable or non-removable – when chemo/radiotherapy shrinks the tumour size obviating the need for the stent. Most companies produce both the types but non-removable is the one most commonly used. Removable stent will have a string at the proximal end which can be grasped with a forceps and the stent can be pulled out.
- Different makes from different companies are available:
- Pyramed: Niti-S
- Alveolus Inc: Alimaxx-E
- Boston Scientific: Ultraflex and newer wallflex
- Other variables like foreshortening, radial force, delivery system diameter ( Pyramed’s Niti-S is 16F whereas Boston’s ultraflex is 18F) and flares also come into consideration but beyond the scope of our discussion.
- Recently biodegradable stents are being used to treat benign oesophageal strictures which require frequent dilatations ( SX-ELLA stent)
- Also Pyramed has come up with a TTS oesophageal stent which will be available in very near future.
How to deploy
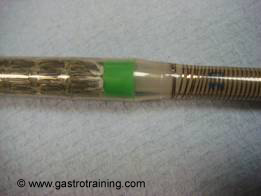
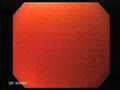
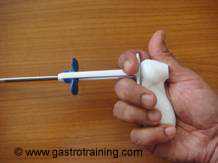
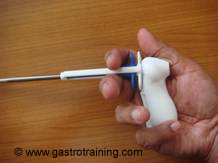
Picture1and 2: The top green marker in Alveolus stent: The stent has just began to open
- Jelly on the stent tip
- Hold the tip of the stent with the left hand and glide it over the guide wire while holding the guide wire with the other hand
- Screen- the proximal, midpoint and the distal end of the stent is marked with radio-opaque marker. The proximal end will also have a coloured marker for most stent if you are using scope alongside technique.
- Stop when the middle marker of the stent is at the mid-point of the stricture- you might have to zoom out to see all the three markers of the stent
- Or stop when the top of the stent assembly is 2cm above the top tattoo ( if under direct endoscopic vision see the top marker – eg. Green marker in Alimax-E)
- Once you start to deploy ( slight variation of actual technique depending on which company you are using, but principle is same)- remember about halfway there is a period of no return for most of the stent ie you can resheath and reposition before you cross this point if you are too far in or out and redeploy again. But once you cross this point you cannot resheath.
- Remember the cone effect-
- The stent will slip upwards if the major portion of the stent happens to be above the stricture at the time of deployment( then maintain inward push on the stent assembly )
- The stent will slip downwards if the major portion of the stent happens to be below the stricture (then you need to exert outward pull)
- Some gastroenterologists pass the endoscope along side again after passing the stent assembly through the stricture over the guide wire and then pull or push the stent under endoscopic view to keep 2cm of stent above the stricture- advantage is that you are 100% sure that top of the stent is opening above the stricture. Another advantage of the scope alongside technique is that you don’t have to mark the top end of the stricture.
- Throughout the deployment monitor the screen and endoscopic view ( if the scope is alongside) to ensure the waist is developing at the centre of the stent
- Go back with the endoscope and squirt some contrast just at the top of the stent and ensure contrast passes freely into the stomach and there is no contrast leak to suggest any perforation.
Alimaxx-E stent ( Alveolus Inc)
- Pull the white flange of the handle to white flange first
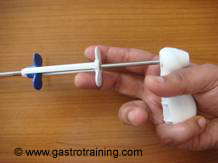
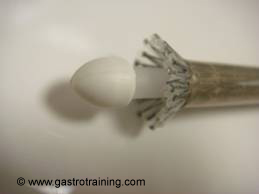
Picture3 and 4: This phase is reversible and stent is half open
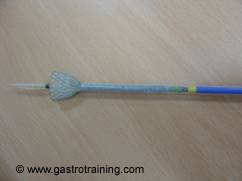
Picture5: This is completion and stent is irreversibly deployed - On screening you will see the stent opening up from below
- Look for flaring of the bottom end – if it does not, the lower end might not have passed the stricture- particularly when you estimated the length of the stricture because it was impassable
- This half is reversible and you can re-sheath the stent
- Then pull the blue flange to the white flange
- This is irreversible
- Continuously pull outwards as the stent deploys otherwise the stent will slip into the stomach as it opens from below
- Look for the shoulder and flaring above and below the shoulder- the shoulder corresponds to the area of the stricture
Niti-S ( Pyramed)
- Unlock the valve of the Y connector handle once the stent is in position for deployment, by rotating the screw counter clockwise

Picture 6 and 7: Niti-S oesophageal stent- the Y connector handle and the inner shaft: the stent opening at the bottom - Hold the end ( hub on the inner shaft) and keep it fixed while withdrawing the outer sheath by holding at the locking screw ( in contrast to push the inner shaft)
- Visualize the stent fluoroscopically to verify full deployment
- The stent opens from bottom ( if using a top release stent – deployment technique is reverse i.e. push the inner shaft rather than pull the outer sheath)
Ultraflex ( Boston)
- Proximal release covered stent can be deployed under endoscopic method
- After passing the stent assembly over the guide wire pass the endoscope up to the stricture and position the endoscope along the delivery system immediately above the visual marker band ( tight black suture area at the proximal end of the stent- we use TIPPEX to make it even more prominent before passing the stent in)
- Hold the delivery catheter stationary with one hand and using the other hand , grasp the finger ring attached to the handle and pull the finger ring to release and unravel the suture.
- Monitor the stent release fluoroscopically and or endoscopically.
- Keep the delivery system between the identified stricture margin.
Aftercare
- Liquid diet for 24 hrs and consider a CXR in 2 hours to check for stent position and exclude perforation.
- PPI, if the stent traverses the GOJ
- Eating advise to patients
- Even after the stent insertion patient can not eat normal diet – must be blenderized or semisolid or THOROUGHLY chewed
- Eat upright
- Frequent sips of liquid during and following the meal
Complications:
- Tumour overgrowth: Options are treatment with Laser followed by re-stenting through the existing stent ( dove tailing)
- Bottom end not opening – balloon dilatation or dove tailing if under estimation of stricture length.
- Stent migration into stomach: migrated stents are very often left alone in teh stomach ( intestinal obstruction with the stent is a possibility). However, you can snare one end of the stent and close to make that end to make a cone and pull out carefully.
Titbits:
- For duodenal or colonic stents principles are the same
- Standard duodenal stents are 20mm and colonic 22mm
- All non covered to prevent migration
- TTS type only
- Use inflated biliary balloon pull back technique to identify the distal end of the stricture.
Here is the link for oesophageal stent insertion video:
Acknowledgement/Bibliography:
- Knyrim K et al.A controlled trial of an expansile metal stent for palliation of esophageal obstruction due to inoperable cancer. N Engl J Med 1993; 329:1302-1307
- Austin AS et al.Placement of oesophageal self-expanding metallic stents without fluoroscopy. Gastrointest Endosc 2001; 54:357-359
- Siersema PD et al.Self-expanding metal stents for complicated and recurrent oesophagogastric cancer. Gastrointest Endosc 2001; 54: 579-586
- Product guide of the respective companies- Alveolus, Pyramed and Boston Scientific