Use of APC
The module covers:
- When to use APC
- How to set it up- both the cable connection and the settings
- How to actually use it once it is set up
- The principle behind APC
When to use APC
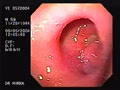
- Mainly in AVMs (particularly GAVE -gastric antral vascular ectasia) and bleeding tumours.
- It can also be used in base of polyps after snare polypectomy.
- Rarely used in bleeding gastric and duodenal ulcers.
- Unblocking of occluded metal stents
How to set it up- both the cable connection and the settings
1. Turn on both the boxes: Top box is normal diathermy unit ERBE ICC200 and bottom box is APC 300
2. Connection of cables:
- Connect the plug of the nessy plate (patient electrode) to the neutral slot of the top box (top box left most plug)- picture1
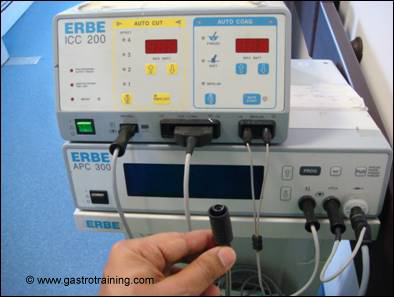
Picture1: Top box is normal diathermy unit ERBE ICC200 and bottom box is APC 300 - Three pronged connector from lower box goes to the Cut/Coag slot of the top box – picture2- (remove the single probe connector which we use most of the time i.e. polypectomy or hot biopsy)- operator holding it after taking it off -in the picture above (Picture1).
- If you forget to connect this, APC will not work – a frequent cause of ‘APC not working’
- Third plug socket on the top box called bipolar is not used in APC and we just leave the plug as it is
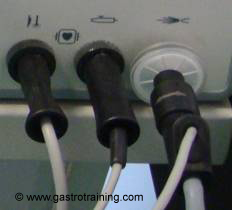
Picture3:The plug holes of the bottom box from left to right-1) goes to the cut/coag hole of the top box- the three pronged cable 2) Not important for us 3) connects to the blue APC catheter - The ash coloured cable from the bottom box ( furthest on the right- see picture 3 ) goes to the blue APC catheter
Picture4: The APC blue catheter (coutesy www.erbe.nl)
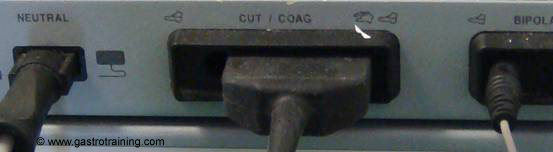
Picture2:The plug holes of the top box from left to right– 1) neutral 2) Cut/Coag- which takes the three pronged plug from the bottom box and 3) Bipolar- not important here
3. The settings on the boxes:
- Set the current setting on the top box by repeatedly pressing the effect select button (bottom button which looks like a loop with an arrow) and the watt select button (middle up/down button)- See picture 5.
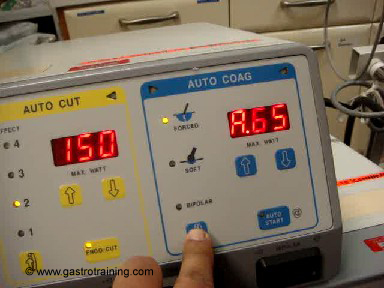
Picture5:Finger on the effect settings- select forced and a second click on same button will make the watt A( A for Argon) and then make it 65 by using up/down button - The setting for lesion in Stomach/Duodenum/Left colon :Auto Coag (Blue right panel) to Effect Forced and Watt A65
- The setting for lesion in right colon :Auto Coag (Blue right panel) to Effect Forced and Watt A40
- The setting for lesion in jejunum/ileum ( as in enteroscopy) :Auto Coag (Blue right panel) to Effect Forced and Watt A30
- We have checked with ERBE Engineers- the yellow Autocut panel is completely irrelevant and does not matter what you set as we use only blue Autocoag pedal (Some endosocpy nurses may insist on the ‘correct setting’ and set a value on the yellow autocut section. This is totally irrelevant).
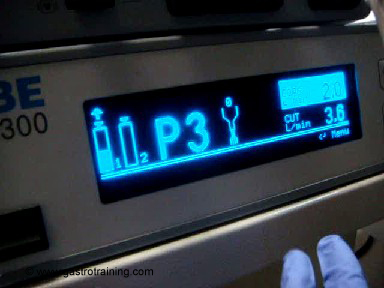
Picture6: Bottom box APC 300- programme 3, cylinder 2 is empty and see the Coag/Cut settings - On the bottom box you don’t normally need to change current setting as mostly we don’t touch the settings –
- Make sure the programme mode is set to 2-3
- And the both the argon cylinders are not empty – in the picture cylinder 2 is empty
- The setting for coagulation is normally 2.0L/min and is shown on the picture as selected option.For use of APC in small bowel/right colon reduce to 1.5L/min
4. Open the Argon tank valve
5. Purge (the button on the bottom box which says PUR- see picture 1) before using it and then test it by putting the catheter tip in jelly and press the blue foot pedal and see the gas bubble
How to actually use it once it is set up
- The probe is passed through the accessory channel of the endoscope so that the blue tip hovers over the target tissue. A black stripe located a few centimetres proximal to the tip should be visualized to prevent damage to the endoscope.
- The probe should be as close as possible to the lesion without actually touching the lesion. The best way is to actually touch the lesion with the probe and then withdraw a little and then give a burst
- Bursts are controlled with the blue foot switch
- If burst happens when the tip is in contact with the tissue- a submucosal bleb will form. This is a harmless event. But this can be dangerous when you are using deep in small bowel eg Double balloon enteroscopy.
- For right colon use lower settings of CoagA40 in other areas of colon use Coag A65
- Depth of burn is a function of time of burst and the power setting
- Short bursts of 0.5secs to 2secs duration
- Frequently suction off gas to avoid over-insufflations, particularly in the colon.
Advantage over conventional coagulation methods:
- Depth of injury is limited – typically 3mm– better protection against perforation of thin-walled anatomy.
- Can be used over relatively large areas using non contact method
Complications of the procedure:
- Complications are rare. However, like any coagulation method, serious complications can occur, particularly in the right colon. Rare cases of perforations have been reported.
- Other complications like subcutaneous emphysema and pneumoperitoneum have also been reported. These are likely caused by over distension within the right colon.
The principle behind Argon Plasma Coagulation
Picture7: The principle of APC (courtesy www.erbe.nl)
APC uses argon gas to deliver plasma of evenly distributed thermal energy to a field of tissue adjacent to the probe. A high voltage spark is delivered at the tip of the probe, which ionizes the argon gas as it is sprayed for a distance of 2-10mm from the probe tip in the direction of the target tissue. Current density upon arrival at the tissue surface causes coagulation. The application of the energy to the tissue is uniform, and contact free.
APC equipment thus combines argon gas with a monopolar power source. The electrode in the argon channel of the probe is connected to an electrosurgical generator.
The plasma beam has a tendency to turn away from already coagulated (high impedance) areas toward bleeding or still inadequately coagulated (low impedance) tissue in the areas receiving treatment. This automatically results in evenly applied, uniform surface coagulation.
Information regarding The Principle of Argon Plasma Coagulation: (courtesy www.erbe.nl)
Here is the link for APC Video:
Acknowledgement/Bibliography:
- Rolachon A et al.Is argon plasma coagulation an efficient treatment for digestive system vascular malformation and radiation proctitis? Gastroenterol Clin Biol 2000;24(12):1205-10.
- Grund KE et al. Argon plasma coagulation (APC) in flexible endoscopy Experience with 2193 applications in 1062 patients. Gastroenterolgy 1998; 114: A603
- Wilson SA et al. Endoscopic treatment of chronic radiation proctopathy. Curr Opin Gastroenterol 2006;22(5):536-40.
- ERBE: for kindly letting us use the information and pictures