PEG-J tube insertion
The module covers:
- Indication of PEG-J tube
- Contra-indications
- How to insert a PEG-J tube
- Aftercare
- What are the complications
Indication of PEG-J tube
- Patients with Gastroparesis requiring long term feeding
- Gastric outlet obstruction as long as obstruction is not impassable
- Recurrent aspiration pneumonia (although aspiration can still occur from reflux of stomach contents)
Contraindications:
- Gross ascites
- Ongoing chest infection
- Coagulopathy
- Dementia/Persistent vegetative state
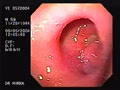
How to insert a PEG-J tube
- A PEG tube is first placed as usual
- Just after the PEG is inserted and before the intestinal tube goes through the PEG tube – slide the outer retaining device of the PEG tube, then the pinch valve and then the blue white ring which holds the PEG Y connector over the PEG tube. Do not connect the PEG Y connector at this stage
- After putting few drops of silicone oil inside of the PEG tube the Intestinal catheter is introduced through the PEG tube and once the tip (weighted bolus) is seen in the stomach, it is grasped with a snare
- Endoscope is advanced into the pylorus and then into the duodenum
- If enterosocpe is used the intestinal catheter can be passed into the jejunum but use of enteroscope is not necessary routinely as the snare can be pushed into jejunum.
- A forceps can be used as an alternative to guide the intestinal tube and some might prefer a forceps over a snare as deep inside the jejunum when you are releasing the tip of the intestinal tube you are better assured that the device ( snare/forceps) is properly detached from the tip and not pulling out the intestinal tube on it’s way out.
- Once the snare is released the assistant can feed in more intestinal tube by simply pushing more tube in
- Withdraw the endoscope from the duodenum taking care that the intestinal tube is not dislodged
- Once the endoscope is in the stomach remove any loops in the intestinal tube by withdrawing it and then the endoscope can be withdrawn completely.
- Next step are the connections of all the adaptors in proper order which can be confusing if not seen before
- For a Freka PEG-J
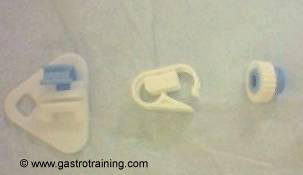
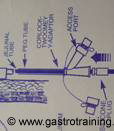
Picture1: In order from left: Outer retaining device:2 quick release clamp: 3 blue white ring- As mentioned before ( this step has already been executed before the intestinal tube went in )-Just after the PEG is inserted and before the intestinal tube goes through the PEG tube – slide the outer retaining device ( item no 1 in the above picture) of the PEG tube, then the quick release clamp ( item no 2 in the above picture) and then the blue white ring ( item no 3 in the above picture) which holds the PEG Y connector over the PEG tube. Do not connect the PEG Y connector at this stage as this increase the friction while the jejunal tube is being passed.
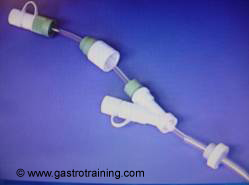
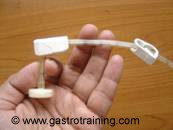
Picture2 : In order from top:1 intestinal luer lock:2 click adaptor:3 PEG Y connector:4 blue white ring which holds the PEG Y connector - After the intestinal tube is positioned and the endoscope is withdrawn – slide the PEG Y connector ( Item no 3 in above picture ) OVER THE intestinal tube and fit with the locking device ( Item no 4 in above picture-blue white ring ) already in place on the PEG tube by twisting. The outer white plastic ring would break off leaving the blue ring behind
- Next slide the click adaptor ( Item no 2 in above picture) over the intestinal tube and press hard onto the PEG Y connector – you will hear a click
- Then cut the intestinal tube to desired length and push in the metal pin of the intestinal luer lock ( Item no 1 in above picture) into the cut end of the intestinal tube.
- Next advance the intestinal luer lock into the click adaptor and then screw in the click adaptor into it by turning the PEG tube – AND NOT BY TURNING THE INTESTINAL TUBE – which if done might dislodge the intestinal tube from the jejunum
- As mentioned before ( this step has already been executed before the intestinal tube went in )-Just after the PEG is inserted and before the intestinal tube goes through the PEG tube – slide the outer retaining device ( item no 1 in the above picture) of the PEG tube, then the quick release clamp ( item no 2 in the above picture) and then the blue white ring ( item no 3 in the above picture) which holds the PEG Y connector over the PEG tube. Do not connect the PEG Y connector at this stage as this increase the friction while the jejunal tube is being passed.
- If using a CORFLO PEG-J
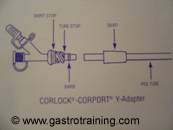
Picture3: Inner bumper, outer retaining device and quick release clamp Picture4: CORLOCK TWOOMEY Y adaptor Picture5: Not to use CORLOCK-CORPORT Y adaptor- As mentioned before ( this step has already been executed before the intestinal tube went in )-Just after the PEG is inserted and before the intestinal tube goes through the PEG tube – slide the outer retaining device of the PEG tube, then the quick release clamp and then the PEG Y connector ( called CORLOCK TWOOMEY Y ADAPTOR) over the PEG tube. Normal PEG comes with a CORLOCK-CORPORT Y ADAPTOR which should not be used with a jejunal tube.
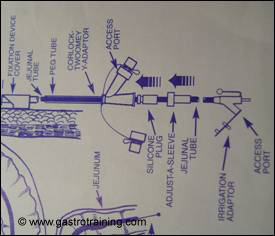
Picture6: Sequence of attachments: Courtesy Merck Serono - Seat the silicone plug in the straight limb of the Y connector gently and introduce the jejunal tube through this
- After the intestinal tube is positioned and the endoscope is withdrawn seat the silicone plug firmly into the Y connector
- Slide the Adjust-a-Sleeve cap over the jejunal tube and screw it to the Y connector
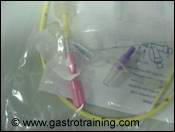
Picture7: The pink stylet is next to be removed after flushing the side port - Remove the stylet from the jejunal tube after flushing the side port with 10ml water.
- Then cut the intestinal tube to desired length and attach the administration set to the end of the jejunal tube.
- As mentioned before ( this step has already been executed before the intestinal tube went in )-Just after the PEG is inserted and before the intestinal tube goes through the PEG tube – slide the outer retaining device of the PEG tube, then the quick release clamp and then the PEG Y connector ( called CORLOCK TWOOMEY Y ADAPTOR) over the PEG tube. Normal PEG comes with a CORLOCK-CORPORT Y ADAPTOR which should not be used with a jejunal tube.
Aftercare
- Aftercare is exactly similar to PEG except that the jejunal tube must not be rotated because of the risk of dislodgement of the intestinal tube from jejunum.
- Another difference is that AXR is needed to verify position of the tip.
- The jejunal tube will last up to 6 months and then it needs to be replaced. The PEG should last for as long as it remains functional.
- Hygiene is of utmost importance as there is no acid barrier in the jejunum as in the stomach
- To prevent buried bumper syndrome PEG tube aftercare advise include rotation of the tube regularly – for PEG-J however that is contraindicated- instead just push the bumper in and pull back.
- Additional aftercare is in common with aftercare of PEG
- Observe the stoma for leakage, inflammation
- Remove keyhole dressing after 24hours if any applied
- Clean the skin around the tube with saline water
- Feeding is usually commenced after 6-12 hours starting with sterile water (refer to local dietician’s protocol)
- Commence 4 hourly flushing with 20mls of sterile water using a 50ml syringe
- Flush with 20ml of sterile water before, during and after medication and enteral feed
- Flush the gastric port with 20ml of sterile water once daily if no contraindication (e.g. gastric outlet obstruction)
Complications:
- Intraabdominal wall abscess
- Necrotising fasciitis
- Peritonitis
- Colonic perforation
- Haemorrhage
- Localised infection
- Leakage or blockage of the tube
- Pressure necrosis
- Mucosal overgrowth around the gastric retaining device
- Misplacement of the jejunal tube
PEG-J insertion video:
Nothing available online but an excellent DVD available from St Marks/ Fresenius Kabi ( Freka ) which also demonstrate all other enteral feeding access
Acknowledgement/Bibliography:
- Guidelines for enteral feeding in adult hospital patients : BSG 2003
- Adler DG et al. Percutaneous transgastric placement of jejunal feeding tubes with an ultrathin endoscope. Gastrointest Endosc 2002; 55: 106-110
- Sibille A et al. An easier method for percutaneous endoscopic gastrojejunostomy tube placement. Gastrointest Endosc 1998;48(5):514-7.
- Bumpers HL et al. A simple technique for insertion of PEJ via PEG. Surg Endosc1994 Feb;8(2):121-3.
- Product guide of the respective companies- Fresenius Kabi and Merck Serono