


Endoscopic Variceal Banding (EVL)
The module covers:
- When to use banding device
- Grades of varix and stigmata of recent haemorrhage
- How to actually use it once it is set up
- How to set it up
When to use banding device
Oesophageal variceal banding is done urgently for haemostasis from a ruptured oesophageal varix and electively as secondary prophylaxis to eradicate the varices.
Sclerotherapy of varices with ethanolamine has fallen in disrepute and should not be attempted.
There is no role for banding for isolated gastric varices
How to actually use it once it is set up
- The patients need to be optimally resuscitated prior to endoscopy. An actively bleeding patient may also need airway protection with endotracheal intubation prior to endoscopy and banding.
- Mapping the varices-Get your bearing right on your way in first time as with the banding device on it will be difficult to see second time
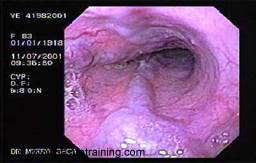
Picture1: Courtesy www.gastrointestionalatlas.com - Describe in your report- position and grade of the varix and whether any stigmata of recent haemorrhage were there or not and the Rockall score at the end of the procedure
- Remember to put the bands on the varices as close to the GOJ as possible but above the Z line to ensure proximal decompression. Don’t put bands on the GOJ or in a hiatal hernia. Don’t put bands higher up as varices fill from below ( bottom 3-5cm)
- Put plenty of jelly on the tip but avoiding the inside of the banding device.
- Go just above the GOJ and suck the varix into the banding device. To do that you will have to make the tip of the scope perpendicular to the wall of the oesophagus. Use big/small wheel to achieve this. You may have to use the wheel lock. Make sure the varix completely obliterates the field (‘the red out’).
- To ensure good suction- set the pump pressure to high and make sure the barrel of the banding device is snugly fitted to the tip of the scope avoiding any gap which will diminish the suction.
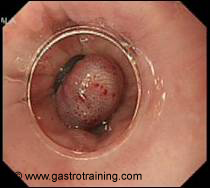
Picture2:One oesophageal varix banded successfully - Fire/release the band by turning the knob clock wise (you will hear and feel a click of band release) – still keep sucking for another 5 seconds and then let go.
- Similarly put more bands on other variceal columns
- Prescribe antibiotics and the terlipressin if not already on
- If intubed for the procedure, the patient can be extubated if stable and the bleeding is controlled
- BSG recommends that after the index banding each varix should be banded with a single band at weekly intervals until variceal eradication.
- Following eradication follow up endoscopy should be performed at 3 months and 6 months and then yearly.
Grades of varix and stigmata of recent haemorrhage
Grade of varix
- Grade I: barely noticeable varix (remember after a big bleed varix can collapse to Grade I)
- Grade II: present but flattens on insufflations
- Grade III: Varix up to 30% of the lumen ( most varices)
- Grade IV: Varix up to 60% of the lumen
- Grade V: Complete obliteration of the lumen by the varix
Stigmata of recent haemorrhage (SRH) : Red spot/ Red Wale markings- Erythematous raised area on the varix indicating high risk of bleeding
How to set it up
We will describe two commonly used banding devices- Boston’s 7 shooters and Wilson-Cook’s 4/6/10 shooters.
Seven shooters – SpeedBand SuperView Super 7™ ( Boston Scientific)
- Inside the pack you will find the ligator handle with the metal string attached to it, the barrel with the bands and the irrigation catheter.
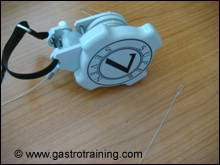
Picture3: The ligator handle with the metal string - Send the wire of the handle through the biopsy channel
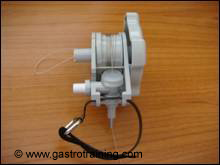
Picture4: The ligator handle from another side showing the fastening Velcro and white side port for irrigation - Insert the ligator handle into the biopsy channel by pushing the metallic end and fix by tightening the Velcro fasteners

Picture5: The barrel with the bands with the attached thread - When the metal string of the ligator handle comes out of the tip of the endoscope loop the string of the ligating device/barrel through it and then pull it from the top of the biopsy channel by turning the knob on the handle clockwise (it can only turn in one direction)
- Stop turning when the barrel is close to the tip of the endoscope. Push the ligating barrel snugly (if not snugly fitted the barrel might come loose in the oesophagus once all the bands are fired) into the tip of the endoscope and keep the string taut by pulling the string from top and fixing it by passing it through the extended axle of the spool (white arrow in the picture)
- When pushing the barrel into the tip of the scope- align the black mark of the barrel along the biopsy channel and remove the plastic covering (it has got a red ring on plastic) the barrel after that.

Picture 6: Showing the attachment of the irrigation catheter - If needed irrigation catheter can be fitted to the white irrigation port on the handle
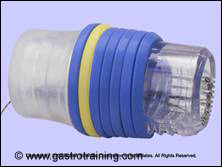
Picture 7: Courtesy Boston Scientific - The ‘last but one band’ ( the sixth band in the seven shooters ) is white/yellow colour – rest are blue
- The super 7 is now ready to be used
Six shooters- Wilson-Cook banding device (Saeed multiband ligator- 4/6/10 shooter)
- Inside the pack you will find ligator handle, loading catheter, trigger cord with Opti-Vu barrel (with the bands on) and irrigation adaptor
Picture 8: Diagram Courtesy Wilson-Cook Medical GI Endoscopy - First insert the ligator handle into the endoscope accessory channel- through the rubber biopsy channel cap. Make sure the handle is on two-way position and not firing position.
- Introduce either end of the loading catheter through the white seal in the ligator- align the s-end of the loading catheter with the slit in the white seal of the introduction port. If you don’t align it is very difficult to push through.
- Advance the catheter till it exits the tip of the endosocpe
- Attach the trigger cord to the hook on the end of the loading catheter, leaving approximately 2 cm of trigger cord between the knot and the hook
- Withdraw the loading catheter from above making the trigger cord to come out through white seal.
- Then push the barrel containing the bands to the tip of the endoscope tip- avoid holding the actual bands. If you don’t push well- during sucking the varix into the barrel, suction won’t be optimum.
- Also remember this barrel does not fit a therapeutic (salmon/red color coded scope) scope tip.
- Next place the trigger cord in the slot on the spool of the ligator handle and pull down until the knot is seated in the hole of the slot. The knot must be seated into the hole for the handle to function properly.
- With the handle in the two-way position, rotate the handle clockwise to wind the trigger cord onto the handle spool (do carefully as too much force might deploy a band)
- With handle in the in the two way position, introduce the endoscope again
- Then place the handle into firing position by pushing it inwards- it is marked on the handle ( see picture)
- The 6 shooters is now ready to be used.
- Irrigation can be done by inserting the irrigation adaptor into the white seal on the handle.
Here is the link for EVL Video:
Acknowledgement/Bibliography:
- Sarin SK et al. Prospective randomized trial of endoscopic sclerotherapy versus variceal band ligation for esophageal varices: influence on gastropathy, gastric varices and variceal recurrence. Journal of Hepatology 1997;26:4: 826-832
- Stiegman GV et al. Endoscopic elastic band ligation for active variceal haemorrhage. Am Surg 1989;55(2):124-128
- Sharara AI et al. Gastroesophageal variceal hemorrhage. N Engl J Med 2001; 345(9): 669-681
- Product guide of the respective companies- Boston Scientific and Wilson-Cook
