


Basics of Colonoscopy
Colonoscopy can be difficult due to the mobility of the colon. Getting a few basics right will help in caecal intubation in the majority;
- Avoid any loops in the scope outside the patient or the umbilical cord. Presence of such loops prevent transmission of twisting (torquing) of the shaft to the tip.
- Avoid simply pushing in (without good views). This will cause loop formation in the colon between the tip and the anus
- Use torque steering to intubate the left colon. It minimises loop formation. Torque steering is achieved by combining rotation of the scope shaft with up or down angulation of the scope tip. Use left/right wheel as little as possible in the left colon.
- Overangulation to get around the bends can be counterproductive. Overangulation of the scope tip leads to a walking- stick handle shape. This pushes the tip against the wall of the colon on the proximal side of the bend, obscuring views and leading to loop formation in the scope.
- Frequent withdrawal movements, combined with suction and torque steering helps avoid looping.
- Try different patient positions. An acutely angled splenic flexure may be opened up and easier to negotiate with the patient on their right side or back. Similarly the hepatic flexure may be opened up and easier to negotiate with the patient on their left side, or on their back.
- Insufflate as little as possible
Resolving the loop
Loop formation can be recognised by loss of one-to-one progression of the shaft to tip or paradoxical movement of the tip. Loop is also recognised by patient discomfort and resistance to insertion.
Loop can be resolved by carrying out the following steps in sequence:
- Withdraw with clockwise torque and re-advance maintaining torque
- Withdraw with anti-clockwise torque and re-advance maintaining torque
- Change the patient position- supine to start with
PS- If there is no resistance to intubation and no patient discomfort, try and push through the loop.
Resolving recurrent loop
Apply the following steps in sequence
- Straighten loop
- Insert again
- If loop reforms, straighten loop and insert again using hand pressure over the sigmoid or transverse colon as appropriate; and
- When past the bend, withdraw to straighten, reapply abdominal pressure and insert again
INTUBATION
Step 1 Rectum
Pull back to distal rectum
Insufflate air above fluid level
Torque steer through the recto sigmoid junction
Step 2 Sigmoid colon
Loop inevitably occurs in the sigmoid colon.
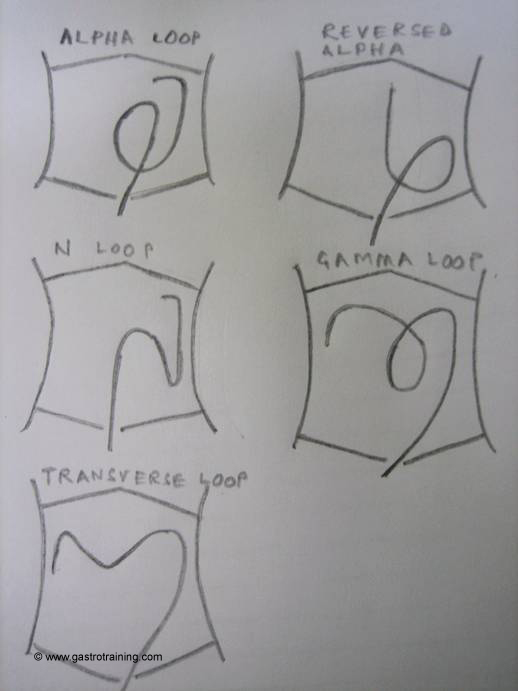
3 types of loop can form in the sigmoid colon; alpha, reverse alpha and N loop
Alpha loop- It occurs when sigmoid is on a long mesentery and there are no adhesions allowing the sigmoid mesocolon to twist easily. An alpha loop is formed only in 10% of the colonoscopies. An alpha loop is a blessing as its shape means there is no acute bend between the sigmoid and descending colon, so the splenic flexure can be reached rapidly and relatively painlessly. Applying de looping manoeuvres half-way round an alpha loop is a potential mistake, since this may cause alpha loop to rotate back into an N-spiral loop, with much greater difficulty in reaching up the descending colon. It is thus wiser to pass straight on into the transverse colon at 90cms with the alpha loop in position. Alpha loop straightening is by strong clockwise derotation and withdrawal to 50-60 cms.
Reversed alpha loop- Mesenteric fixation variations occur in at least 15% of subjects. This may result in persistence of varying degrees of descending mesocolon. This unusually mobile descending colon forces the colon in an anticlockwise reversed alpha loop. This reversed alpha loop allows the scope tip to move into descending colon nearly as easily as alpha loop. Since around 90% of sigmoid loops spiral clockwise, this variation is significant to the endoscopists as it will need anticlockwise de rotation to resolve the loop.
N or spiral sigmoid loop- occurs if the sigmoid is on a short mesentery. It is also formed when the sigmoid is on a long mesentery and the retroperitoneal fixation of the descending colon is low in the pelvis. Removal of N loop is essential to help passage into the descending colon. Straightening out N loop involves pulling back with clockwise (usually) twist. Most of the pain and difficulties experienced subsequently in colonoscopy (during intubation of splenic flexure, transverse and hepatic flexure) stems from recurrent or persistence N looping.
When one-to-one is lost at mid sigmoid colon (SC) usually due to N loop: try
- Clockwise pull back to see if this starts to advance scope tip
- If not try anticlockwise torque
- If unsuccessful- change position to supine and try again
- If unsuccessful- forceful push through is only occasionally required. It helps to warn the patient of a few moments of stretch discomfort. Then a firm but decisive pressure is applied to advance the scope tip into the descending colon. Then try and reduce loop again
- Abdominal hand pressure (inwards and downwards pressure towards the pelvis) often helps during sigmoid insertion, since the sigmoid frequently loops anteriorly close to the abdominal wall. Hand pressure in the left lower abdomen helps by reducing the size of the loop by acting as a buffer to transmit more of the inward push on the shaft toward the descending colon.
Step 3 Sigmoid descending junction (SDJ)
The SDJ is the trickiest point of examination for most colonoscopists. SDJ conventionally appears as an acute bend at around 40-70 cms. Follow the steps a-e above to reach descending colon. Once in the descending colon- push in maintaining torque to reach the splenic flexure.
Step 4 Splenic flexure (if acute or underwater, change position)
- Check the length of the scope: if greater than 50-60 cms: pull back to straighten the scope to 50 cms
- Insert scope with clockwise twist to control sigmoid looping (remember paradoxical movement may occur initially if splenic flexure has been pulled down by colonoscopic withdrawal). If looping occurs, try stiffening scope stiffener.
- If not progressing, change position to supine or right lateral.
- If not working- use sigmoid hand pressure
Reversed splenic flexure- Scope tip passes laterally rather than medially around the splenic flexure, because the descending colon has moved centrally on a mesocolon (normally desc colon is fixed retroperitoneally). Here clockwise torque doesn’t work and an anticlockwise torque will be needed to push to hepatic flexure
Step 5 Transverse colon
- Distal transverse colon- keep clockwise torque and use scope stiffener if needed.
- Mid transverse colon-hepatic flexure
Scope forms a transverse loop- this often forms a sharp bend
Steer around the angulation into proximal TC. Remember scope advances with steering (avoid impaction on opposite wall)
The most important manoeuvre is to pull back repeatedly (repeated in and out movement- like playing a trombone) – this lifts up the transverse loop and advance to hepatic flexure.
Anti-clockwise torque helps advance the scope in proximal transverse colon. If necessary change position or apply hand pressure (see below)
If unable to reach hepatic flexure by pulling back: push through transverse loop to advance scope tip and repeat.
The hepatic flexure may be pushed down by asking patient to hold a deep breadth
Sometimes a gamma loop may form in a very long redundant TC. It is large and rarely removable. Push through the loop to reach caecum.
(Hand pressure over TC- Hand pressure over TC is helpful in about 30% of transverse colons. Hand pressure may be applied over left hypochondrium- to push the whole loop toward HF, mid-abdomen- to counteract the sagging TC or right hypochondrium- to impact directly on the HF. It is worth remembering that sigmoid tend to re loop at all stages of the examination. Thus sigmoid pressure is also a good bet whenever the scope is looping)
Step 6 – HF to caecum (the ascending colon and caecum are fixed retroperitoneally)
On seeing the AC, the temptation is to push in. However this may re-form the transverse loop. The trick is to aspirate air and pull back the scope. When the tip starts to fall back- reinsert
Intubation of caecal pole may be easier in supine position
Identifying caecum
- At the caecal pole the three taeniae fuse around the appendix to form a crow’s foot or ‘Mercedes Benz’ sign
- Crescentic appendicular slit. The operated appendix looks no different unless it has been invaginated into a stump, when it can sometimes resemble a polyp. (Beware- take a biopsy and do not attempt polypectomy)
- Ileocaecal valve- situated about 5 cms from the caecal pole
Step 7- Terminal ileum
TI intubation may be easier in left lateral position
Aspirate air to make the ICV obvious
Observe ICV from 5-10cms above valve. Predict opening to TI by observation and appendix orifice (bow and arrow trick- see below)
Rotate scope and bring ICV at 6’o clock position
Insert scope over IC valve
Pull back scope onto first major fold
Insufflate with very slow pull back until TI mucosa seen.
Enter TI
The TI can also be entered by direct intubation if opening is visible
Bow and arrow trick to enter TI
Find the appendix orifice
Imagine an arrow pointing in the direction of the appendix lumen
Angulate in that direction and pull back (still angled) for about 3-4 cm
At this point expect the proximal lip of the ICV to start to ride over the lens
Insufflate with very slow pull back- twist or angle gently to enter TI.
Step 8 Retroversion in rectum
Rectum is very capacious and hence retroversion is important to examine rectum completely. The most distal part of rectum is especially a potential blind spot.
Choose the widest part of rectum and angulated both controls fully and push inward to invert the tip toward the anal verge.
Retroversion is not always possible in a small or narrowed rectum
Ref- Cotton PB, Williams C. Practical Gastrointestinal Endoscopy. The Fundamentals. 5th Ed
