


Steps of cleaning an endoscope(Shown here with a Pentax Scope)
The module covers:
- Pre-cleaning inside the room
- How to do leak testing
- Actual wash and manual cleaning
- Automated endoscopic reprocessor
- Storage
- Pre-cleaning inside the room
- Ensure correct Personal Protection Equipments (PPE) are worn at all times of decontamination ( Gloves, Apron, Sleeve protectors and +/- Visor)
- Suck the endozyme solution immediately by pressing the suction button
- Wipe the outer surface of the scope with endozyme soaked sponge
- Switch off the air/water pump and disconnect the water tube
- Switch off the suction pump and remove the suction tube from the scope
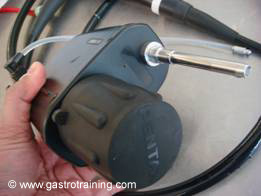
- Take the scope off the processor and lay on the tray with wheel upwards
- Put the soaking cap on the PVE connector head
- Put the sliding lock onto the Air/Water valve
- Put the tubing to the additional port next to the water port and put a special metal adaptor on the water port
- In this picture the metal cap on water port is not placed yet but in lower picture it is
- Inject endozyme into the ports ( suction/biopsy/water/ additional)
- Put the Air/Water valves in the metal container ( tea strainer)
- Take the tray with the dirty endoscope to the cleaning area after covering with the tray liner ( the red liner)
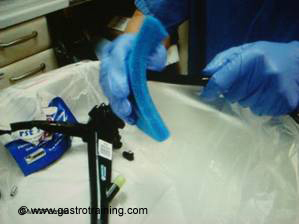
Picture1: Cleaning outside with the sponge soaked with endozyme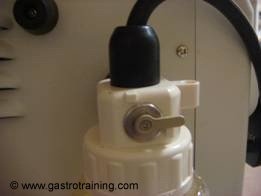
Picture2 and 3: The water valve is turned off: and is disconnected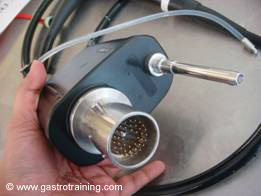
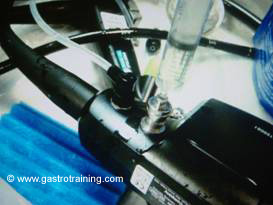
Picture4 and 5: The PVE head: covered with the soaking cap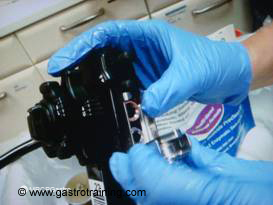
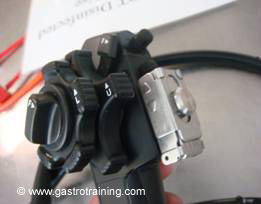
Picture6 and 7: The channel separator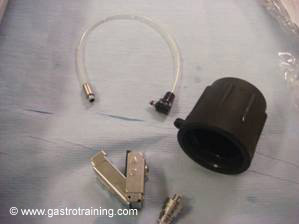
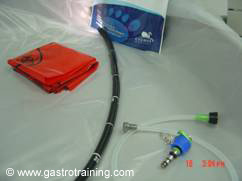
Picture8: Titbits for decontamination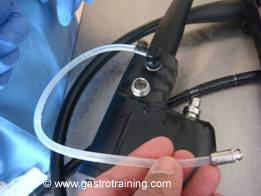
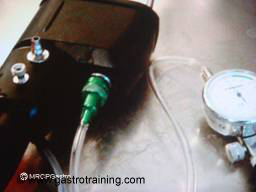
Picture9:Tubing fitted on forward water jet port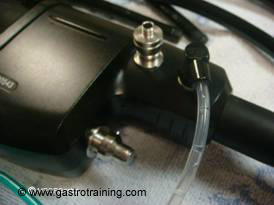
Picture10 and 11: The metal cap is on the water port: and being flushed in the room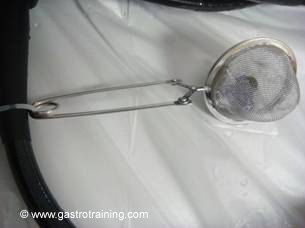
Picture12: Water/Air valve in the tea strainer - How to do leak testing
- Beginning step in the decontamination area is leak testing
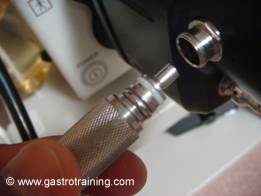
- Connect the leak tester to the leak test port
- Increase the pressure to the required amount ( the green zone)
- Keeping the pressure high, manoeuvre the tip of the scope to look for evidence of leakage- immerse in next stage in water only if leak test is ok.
- Take the leak testing tubing off
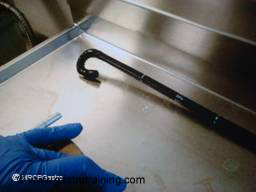
Picture13 and 14:The leak testing tubing with the green nozzle: tip to be manoeuvred - Actual wash and manual cleaning
- Fill the sink with 15 litres of water ( temp less than 35 degrees Celsius) and add 60ml of Endozyme solution
- Soak the endoscope in the sink
- Take the sliding plate off the air/water port
- Clean the valves( suction and water/air valve) with the short brush ( purple here)- Put the valves back into the tea strainer and also the metal cap of the water port
- Next clean the control wheels and the tip of the scope and also the rubber water jet valve ( next to the water port)
- Clean the ports ( suction/biopsy/water/ additional ) with the long brush ( blue here) x 3 times
- Put the channel separator back again and flush all the channels with Endozyme mixed water of the sink
- Transfer to clean water sink and flush the port again with clean water
- Automated endoscope reprocessor
- Connect the different colour coded tube to the different ports
- A typical sequence
- Red- leak testing port
- White- extra water port
- Orange-Biopsy port
- Blue- water port
- Brown- suction port
- Green/Yellow- additional
- Ensure that the tubings are not going to be caught in the rotating sprinkler
- Close the lid, select the cycle and enter the scope details and hit the start button
- The paperwork
- Place the endoscope and pre-manual clean and patient ID labels in appropriate section of the Traceability/Tracking Logbook
- Record Manual cleaning details and Loading of endoscope in AER
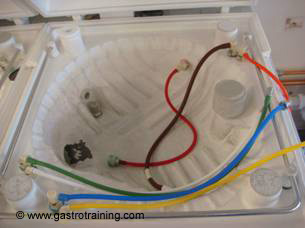
Picture15: The colour coded tubes in the AER - Storage
- Blow air through the different channels to make it dry- Some of the trusts stopped doing it as prions thrive in dry environment. After cleaning an endoscope can follow either of these three paths:
- Used immediately or within three hours
- Stored in UV cupboard and then it can be used within next three days
- Hang the scope in a well ventilated cupboard removing all the valves, seals, soaking caps and angulation locks for storage
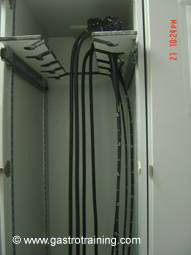
Picture16: Drying cupboard
Then it has to be disinfected again before use next morning by passing it through AER machine ( but decontamination i.e. manual cleaning is not needed)
- Blow air through the different channels to make it dry- Some of the trusts stopped doing it as prions thrive in dry environment. After cleaning an endoscope can follow either of these three paths:
With an Olympus scope
- Then clean the outside of the scope with the soaked sponge in side the cleaning solution ( First step)
- Switch off the air pump.
- Dip the tip of the endoscope into the enzymatic detergent and the black plastic end of the rubber tube to the biopsy port and dip the other end in the same pot of enzymatic detergent.
- Then close the air/water port with the blue coloured AW channel cleaning adapter and switch on the air pump again. Some trusts keep the air pump on until cleaning is finished.
- The AW channel cleaning adapter continually blows air then through the air/water channel. It is dangerous to accidentally use this valves when doing a procedure as it continuously blows air in and can distend and cause rupture in colon. So that it does not happen it comes attached with a card. And when you depress that valve then it flushes the air/water channel with water.
- Keep pressing the suction button and that will suck the channel thoroughly with enzymatic cleaner. Then you should lift the insertion tube/tip from solution and suck air.
- Then repeat the procedure again but this time dip both scope tip and the flushing catheter in clean water pot. It is said that the fluid should percolate for a total of 30 seconds.
- Remember air/water channel and suction/biopsy channel are two different channel and are to be cleaned separately.
- Next remove the water/air catheter and suction catheter after switching off the pump.
- Take off the cover of the electric connector and immediately cover it with the water resistant soaking cap.
- In the next step of leak testing the leak testing catheter is connected to the air vent of the soaking cap.
Picture17: The blue AW channel cleaning adapter, flushing catheter, enzymatic detergent ( First step)
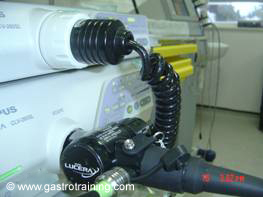
Picture18: The Electrical connector to be removed…
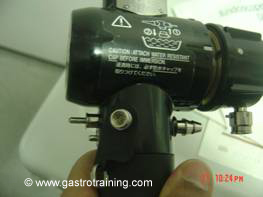
Picture19: …And end is covered with the soaking cap ( the air venting port takes the leak testing catheter in the next step)
